Project Requirements
- 💯 Worth:
- Proposal: 5%
- Implementation: 25%
- 📅 Due:
- Proposal: November 30 @ 23:59
- Implementation: December 14 @ 23:59
- Demo: December 15/16 @ your scheduled slot
- 🚫 Penalty: No option for lates. You must demo what you have been able to accomplish by the implementation deadline.
🎯 Objectives
Section titled “🎯 Objectives”- Combine everything you’ve learned during this course to create your own video game.
✒️ Description
Section titled “✒️ Description”This is it - the culmination of all the skills and knowledge about game development over this past semester. It’s like fighting the final boss at the end of a game. I know you have everything it takes to conquer it! 😉
This project can be done, at most, in pairs. The project scope should scale with the number of people. In other words, I expect a bigger game with more features from pairs than from individuals. I will try to ensure this as best as possible based on your proposal. No, you do not have to work with someone from your own section.
The game itself is largely up to you - I want you to get creative!
📐 Proposal
Section titled “📐 Proposal”I ask that you go about your design and architecture in a meaningful and purpose-driven way. For this reason, I’m asking you to first write a proposal for your game. This will make you think about the different states, classes, relationships, design patterns, etc. that you will have to adhere to when it comes time for the implementation.
The proposal has a soft deadline which means that it’s not subject to the usual late penalty. However,
- If you submit your proposal before the soft deadline, you will have the opportunity to incorporate my feedback and resubmit continuously until your proposal meets all the requirements for a perfect score (5/5). This ensures your implementation is based on a strong foundation.
- If you submit your proposal after the soft deadline, your initial proposal grade will be final. While you won’t be able to improve your proposal grade, you can still use my feedback to refine your approach and ensure your implementation aligns with the project criteria.
-
The proposal document should be the
README.mdfor your repo.- Please look in the
Sample-Proposalfolder of this repo to get an idea of how your proposal should look. - If you’re not familiar with writing markdown (
.md) then please do this short tutorial. You can also look at any of theREADME.mdfiles I’ve written for you over the course of this semester for reference.
- Please look in the
-
The proposal must include the following sections:
-
Description including the premise, the genre (ex. puzzle/action/adventure/shooter/etc.), the control scheme (ex.
mouseto shoot,wasdto move,spacebarto jump, etc.), and the gameplay. -
Requirements about what the player should be able to do in your game.
-
Diagrams
-
State Diagrams including game states (ex. Breakout) and entity states (ex. Mario or Zelda).
-
Class Diagram where you outline:
- All (important) classes in your game and the relationships between the classes
- Inheritance and polymorphism
- Factory pattern
-
If you’re curious how I do mine, I use Mermaid to write out my diagrams in plaintext and then render them automatically.
-
If you’d rather use a GUI, app.diagrams.net and Lucidchart are good free tools.
-
-
Wireframes to give yourself a rough idea of what the game will look like and to give me a preview of what to expect.
- These can be hand drawn (paper or tablet) or digitally drawn using tools like MSPaint, Photoshop - whatever is easiest for you!
- If you go hand drawn then please scan in photos of your drawings to include in the proposal document.
- Here’s a great example video of game wireframes.
- Here’s a great collaborative tool to create your wireframes. This tutorial shows how to use it for web wireframes, but you can use it for anything.
- These can be hand drawn (paper or tablet) or digitally drawn using tools like MSPaint, Photoshop - whatever is easiest for you!
-
Assets describing which images, sounds, and fonts you’ll be using for your game and where you’ll get them from.
- It’s imperative to always cite your sources!
-
And any other sections you think are relevant to explain the implementation details of your game.
- Maybe you’re using an external library?
- Maybe you’re not using canvas/JS and using something else like Godot?
- Maybe you’re implementing an interesting algorithm?
- Make sure to explain it all in detail here!
-
Yes, the final implementation will probably not be 100% accurate based on the proposal, and that’s fine. Things change along the way, that’s just how development works. What’s important is that you start from a place of intentionality and don’t immediately start by writing code. My goal is for you to satisfy all the grading critera!
🔨 Implementation
Section titled “🔨 Implementation”This is where the fun begins! The game itself is all up to you, however, I want to see specific elements in your code that show me you’ve progressed as a developer and aren’t writing first-year level code! 🙈
🤖 State Machines
Section titled “🤖 State Machines”- At the very least, you should have one global state machine that controls the state of the game.
- The bare minimum states are
TitleScreenState,PlayState,VictoryState, andGameOverState(you can rename them if you wish), though I expect you’ll have more. - As we saw in Mario and Zelda, individual entities can have their own state machines as well.
- This will be based on the state diagram you provide as part of your proposal.
🧱 Inheritance & Polymorphism
Section titled “🧱 Inheritance & Polymorphism”- I want to see good object-oriented practices in your code. When you have different “types” of anything in your game, that’s the telltale sign you need inheritance to define them and polymorphism to control them. In Breakout and Mario, we had types of power-ups. In Angry Birds, we had types of Birds - get the idea?
- Like the state diagram, I’ll need to see a class diagram that lay out the major classes and their relationships to each other. The states are technically implemented as classes, but don’t include them in the class diagram.
🏭 Factory Design Pattern
Section titled “🏭 Factory Design Pattern”- To create all those “types” of things in your game, stick the creation logic inside its own dedicated Factory class.
- See
EnemyFactoryfrom Zelda orBirdFactoryfrom Angry Birds as examples. - This should also be explicitly shown in your class diagram.
🔢 Enums
Section titled “🔢 Enums”- Get rid of any magic numbers or strings from your code using enums.
- Almost every game we’ve done has had enums - refer to those as examples.
🍄 Game Entities & Game Objects
Section titled “🍄 Game Entities & Game Objects”- Starting from Mario we learned about entities and objects. Usually, entities are more “intelligent” than objects. Entities can interact with objects that are collidable, solid, or consumable. You should know the deal by now!
🎯 Collision Detection & Hitboxes
Section titled “🎯 Collision Detection & Hitboxes”- Whether it’s AABB, tilemap collision, or using a physics engine, I want to see some form of collision detection in your game.
- To make your collisions more realistic, feel free to use the
Hitboxlibrary class.
💾 Persistence
Section titled “💾 Persistence”- Remember in Breakout where we persisted high scores? I want your game to use persistence as well via local storage. You can save scores, game options, or for full points, even the entire game state so players can resume where they left off!
🎉 Win & Loss Conditions
Section titled “🎉 Win & Loss Conditions”- The fundamental thing that makes a game a game is the fact that you can win or lose. This should be pretty self-explanatory.
🏆 Score/Points/Prizes
Section titled “🏆 Score/Points/Prizes”- Your game needs some form of reward system. Maybe your character gains points as they kill enemies, maybe they accumulate wins per round, maybe they’re awarded medals at the end. It’s all up to you and what makes sense for your game.
👾 Sprites
Section titled “👾 Sprites”- No coloured canvas shapes! There are tons of free sprites online.
- A lot of the sprites for the games in this course came from itch.io and opengameart.org.
- Be sure to credit the creators of the art like I did at the top of the
main.jsfiles.
🏃🏾♂️ Animations
Section titled “🏃🏾♂️ Animations”- Give your entities life by iterating over multiple sprites in a sprite sheet.
- Use the
Animation.jslibrary class and go back to the notes if you need a refresher.
🎵 Sounds & Music
Section titled “🎵 Sounds & Music”- Sounds add that extra bit of polish. I want to see sound effects for things like UI element selection, walking, fighting, shooting, jumping, winning, losing - whatever makes sense for your game.
- The sounds for the games in this course were largely taken from freesound.org and opengameart.org.
- Be sure to credit the creators of the sounds like I did at the top of all
main.jsfiles.
🖋️ Fonts
Section titled “🖋️ Fonts”- Like sounds, fonts also contribute to the polish factor. Have different fonts for your title screen and the various UI elements in the game.
- I got mine from dafont and Google Fonts.
- Be sure to credit the creators of the fonts like I did at the top of the
main.jsfiles.
📖 Instructions
Section titled “📖 Instructions”- Your game needs a way to teach players how to play. Don’t assume everyone will intuitively know your controls or mechanics.
- You have several options:
- Instructions State: Create a dedicated state showing controls and gameplay mechanics, accessible from your title screen.
- Tutorial Level: Build a guided first level that teaches mechanics gradually.
- DOM Instructions: Add instructions outside the canvas using HTML/CSS. For example, a collapsible section or modal window players can reference anytime.
🧃 Juice
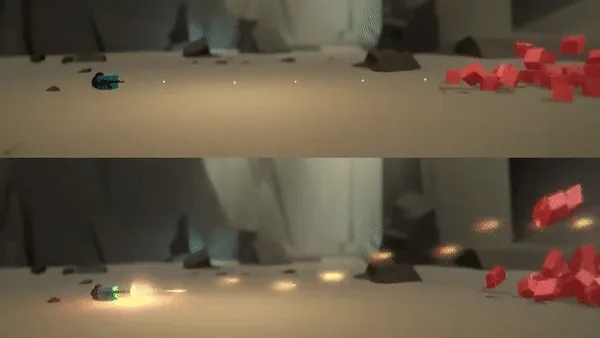
Section titled “🧃 Juice”- “Juice” refers to all the little visual and audio effects that make your game feel satisfying and polished. It’s the difference between a functional game and a game that feels good to play!
- Notice in the GIF below how the top version is technically functional but feels flat? The bullets just appear, enemies just disappear. Now look at the bottom version with juice: particle effects on bullet fire, subtle screen shake on hits, enemies stagger when damaged, death animations with more particles. These small touches make a huge difference!
- Ways to add juice:
- Particle effects for impacts, explosions, collecting items
- Smooth transitions between states using tweens like we did in Match 3 or Pokemon.
- Stagger/knockback animations when entities take/deal damage, like the goombas in the Mario assignment
- Visual feedback like flashing sprites on damage or brief invincibility effects, like in Zelda
- Screen shake when something big happens
- This classic 15 minute talk by Martin Jonasson and Petri Purho explains juice brilliantly.
- I’ll want to see at least a couple of different tweens, so be sure to use the
Timer.jslibrary class to tween values over time. Go back to the notes if you need a refresher.
📊 User Interface
Section titled “📊 User Interface”- This refers to the in-game HUD (Heads-Up Display) shown during actual gameplay.
- Show the player what they need at a glance: health, score, lives, collected items, timers, active power-ups, ammo, combo meter, objective progress — whatever is core to your game’s loop.
- Pull inspiration from past games like Breakout or Pokemon.
🌿 Git Usage
Section titled “🌿 Git Usage”- I want to see that you’re using Git effectively throughout your development process, not just as a submission tool!
- Branching: Each major feature should have its own dedicated branch (e.g.,
feature/player-movement,feature/enemy-ai). Once complete, merge it back intomain. - Commit History: Your commits should tell a story. When I look at a feature branch’s history, I should see your development process - the incremental steps you took. No giant commits that say “added everything” or “fixed stuff”! Instead, commit frequently with descriptive messages like “Add player jump animation” or “Fix collision detection bug with platforms”.
- Think of your Git history as documentation of your problem-solving process. It shows me how you broke down big problems into smaller, manageable pieces.
🫥 Template
Section titled “🫥 Template”The starter template contains a skeleton file/folder structure based on the games we’ve done this semester. Mainly, it contains the lib/ files required to build the various components of your game. It’s up to you if you want to use it or not, but I think it’s a useful starting point.
📥 Submission
Section titled “📥 Submission”Once you’ve made your final git push to GitHub, here’s what you have to do to submit:
- Ensure that the
README.mdfor your repo is the proposal document. - Notify me via Teams as soon as you push so that I can take a look and give you the green light to start implementation.
- Schedule an (online, on Teams) demonstration appointment with me where I’ll be grading your submission on the spot using a grading rubric.
- Details for how to schedule the demo will be available closer to the deadline. You don’t have to wait until the official slots are available to demo. If you’re done earlier, let me know, and we’ll find a time to demo so you can get this class off your plate and focus on the 42 other things you have to do for school!