🍄 Mario
Super Mario Bros. was instrumental in the resurgence of video games in the mid-80s, following the infamous crash shortly after the Atari age of the late 70s. The goal is to navigate various levels from a side perspective, where jumping onto enemies inflicts damage and jumping up into blocks typically breaks them or reveals a power-up.
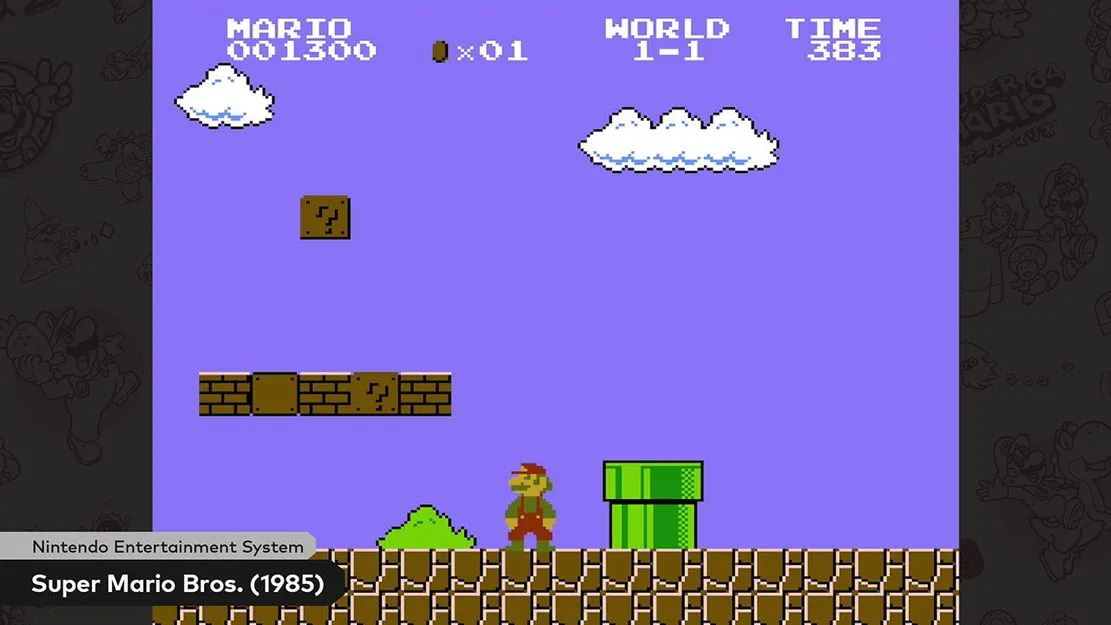
Image from Nintendo
🎯 Objectives
Section titled “🎯 Objectives”- Tilemaps: Create an entire game world from a simple 2D array.
- Cameras: Implement a camera that follows the player character around in the world.
- 2D Animation: Enable sprites to appear like they’re walking, sliding, jumping, etc.
- Platformer Physics: Implement basic platformer physics so that we don’t have to iterate through our entire world to determine collisions.
- Game Entities: Things like enemies, blocks, and coins.
🔨 Setup
Section titled “🔨 Setup”-
Clone the repo (or download the zip) for today’s lecture, which you can find here.
-
Open the repo in Visual Studio Code.
-
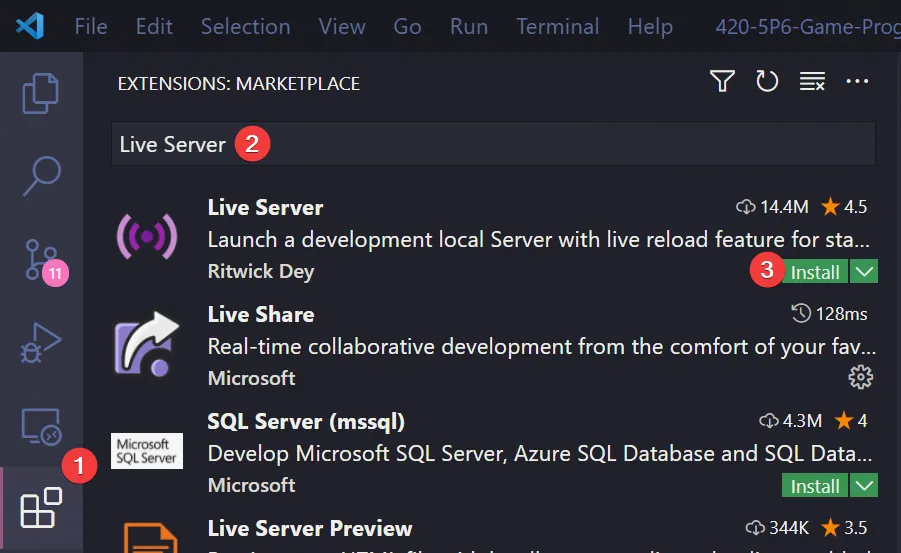
Start Visual Studio Code’s “Live Server” extension. If you don’t have it installed:
-
Click on the extensions icons in the left-hand side navigation.
-
Search for “Live Server”.
-
Click install next to the extension by “Ritwick Dey”. You may have to reload the window.
-
Once it’s installed, click “Go Live” on the bottom right of the window. This should start the server and automatically open a new tab in your browser at
http://127.0.0.1:5500/(or whatever port it says on your machine).- The files the server serves will be relative to the directory you had open in VSC when you hit “Go Live”.
-
🌅 Mario-0 (The “Day-0” Update)
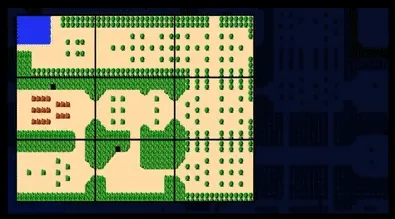
Section titled “🌅 Mario-0 (The “Day-0” Update)”Mario-0 generates a simple tilemap using data loaded from a JSON file, creating a world larger than what the canvas can display.
Tilemaps
Section titled “Tilemaps”- A tilemap represents a large game world composed of small, uniform tiles.
- Each tile in the map can have different properties (e.g., solid, empty) that determine player interaction.
- In our implementation, we use a 1D array to store the tile data, which is more memory-efficient than a 2D array.
Important Code
Section titled “Important Code”src/config/tilemap.json: Contains the tile data for our level. This file was created using the Tiled Map Editor.src/services/Tile.js: Represents one tile object in the tilemap.src/services/Layer.js: Manages a layer of tiles, handling their creation and rendering.src/services/Map.js: Loads the tilemap data and creates the game world.
First, we load the tilemap data and create our layers:
constructor(mapDefinition) {    this.width = mapDefinition.width;    this.height = mapDefinition.height;    this.tileSize = mapDefinition.tilewidth;    this.tilesets = mapDefinition.tilesets;
    const sprites = Sprite.generateSpritesFromSpriteSheet(        images.get(ImageName.Tiles),        this.tileSize,        this.tileSize    );
    this.layers = mapDefinition.layers.map(        (layerData) => new Layer(layerData, sprites)    );}
Next, we create our tiles using a 1D array:
static generateTiles(layerData, sprites) {    const tiles = [];
    layerData.forEach((tileId) => {        const tile = tileId === 0 ? null : new Tile(tileId - 1, sprites);        tiles.push(tile);    });
    return tiles;}
To find a specific tile in the 1D array, we use this equation in the getTile method:
getTile(x, y) { return this.isInBounds(x, y) ? this.tiles[x + y * this.width] : null;}This equation converts 2D coordinates (x, y) into a 1D array index.
Rendering the Tilemap
Section titled “Rendering the Tilemap”In Map.js, we render each layer of our tilemap:
render() { this.layers.forEach(layer => layer.render());}Each Layer then renders its tiles:
render() { for (let y = 0; y < this.height; y++) { for (let x = 0; x < this.width; x++) { this.getTile(x, y)?.render(x, y); } }}This approach allows us to create a world larger than our canvas, setting the stage for camera implementation in the next section.
🎥 Mario-1 (The “Camera” Update)
Section titled “🎥 Mario-1 (The “Camera” Update)”Mario-1 introduces a camera system that allows the player to explore the entire map by moving in all directions: up, down, left, and right.
Cameras in 2D Games
Section titled “Cameras in 2D Games”In games that take place in a large 2D/3D space, we cannot hope to show the player everything in the world/level for a number of reasons. For example, if you tried to cram everything in the world into one canvas, everything would be too miniscule to see properly. Or, maybe you want the player to complete some sort of puzzle or challenge and being able to see everything in the world would give the player the answer right away.
The idea of a “camera” is to only show the player one subsection of the world at any given moment. As they move their character in the world, the camera moves with them to reveal other parts of the world that were previously unseen.
If you’re interested in learning more about cameras, here are some informative videos for you to watch depending on your level of curiosty:
- 2D Game Cameras by Luis Zuno (5:52)
- How Cameras in Side-Scrollers Work by Itay Keren (52:34)
- How to Make a Good 2D Camera by Game Maker’s Toolkit (11:37)
Important Code
Section titled “Important Code”src/services/Camera.js: Manages the camera’s position and movement.src/states/PlayState.js: Updates and applies the camera transformation.
In Camera.js, we define the camera’s behavior:
export default class Camera {  constructor(map, width, height) {    this.map = map;    this.width = width;    this.height = height;    this.position = new Vector(0, 0);  }
  update(dt) {    // Move camera based on input    if (keys.w) this.position.y -= CAMERA_SPEED * dt;    if (keys.s) this.position.y += CAMERA_SPEED * dt;    if (keys.a) this.position.x -= CAMERA_SPEED * dt;    if (keys.d) this.position.x += CAMERA_SPEED * dt;
    // Clamp camera position to map boundaries    this.position.x = Math.max(      0,      Math.min(        this.position.x,        this.map.width * this.map.tileSize - this.width      )    );    this.position.y = Math.max(      0,      Math.min(        this.position.y,        this.map.height * this.map.tileSize - this.height      )    );  }}
In PlayState.js, we apply the camera transformation before rendering:
render() {    this.context.save();    this.context.translate(-Math.floor(this.camera.position.x), -Math.floor(this.camera.position.y));
    this.map.render();
    this.context.restore();}
Key Features
Section titled “Key Features”-
Four-Directional Movement: The camera can now move up, down, left, and right, allowing full exploration of the map.
-
Boundary Clamping: The camera’s position is clamped to prevent it from moving outside the map’s boundaries.
-
Smooth Movement: By using delta time (
dt) in the camera update, movement remains smooth regardless of frame rate. -
Pixel-Perfect Rendering: The camera’s position is rounded using
Math.floor()to ensure pixel-perfect rendering and prevent blurring.
How It Works
Section titled “How It Works”- The camera’s position is updated based on keyboard input (W, A, S, D keys).
- Before rendering, we translate the canvas context by the negative of the camera’s position.
- This translation effectively moves the entire world in the opposite direction of the camera, creating the illusion of camera movement.
- After rendering, we restore the context to prevent the camera transformation from affecting other rendering operations.
Use the arrow keys or WASD to move the camera.
🧍♂️ Mario-2 (The “Moving Hero” Update)
Section titled “🧍♂️ Mario-2 (The “Moving Hero” Update)”Mario-2 introduces a fully controllable player character that moves around the screen with the camera following its movement. This update brings our game to life with fluid character animation and responsive camera behavior.
Loading Sprites
Section titled “Loading Sprites”In Player.js, we load sprites from a sprite sheet:
this.sprites = loadPlayerSprites( images.get(ImageName.Mario), smallSpriteConfig);The loadPlayerSprites function (defined in SpriteConfig.js) takes the sprite sheet image and a configuration object that defines the positions and dimensions of each sprite on the sheet. It creates individual Sprite objects for each animation frame.
Player Class
Section titled “Player Class”The Player class in Player.js manages the player’s state, movement, and rendering:
-
State: Tracks position, velocity, dimensions, and flags like
isJumpingandisOnGround. -
Movement:
handleHorizontalMovement()applies acceleration and deceleration based on input.handleJumping()manages jump initiation, continuation, and termination.applyGravity()simulates gravity when the player is in the air.
-
Collision:
checkVerticalCollisions()prevents the player from falling through the ground. -
Update: The
update(dt)method calls all necessary update functions and applies changes to the player’s state.
Sprite Animation
Section titled “Sprite Animation”Animations are handled using the Animation class:
this.animations = { idle: new Animation(this.sprites.idle), walk: new Animation(this.sprites.walk, 0.07), jump: new Animation(this.sprites.jump), fall: new Animation(this.sprites.fall), skid: new Animation(this.sprites.skid),};In the updateAnimation() method, we select the appropriate animation based on the player’s current state (e.g., walking, jumping, falling). The render() method then draws the current frame of the active animation.
Camera Updates
Section titled “Camera Updates”The Camera class in Camera.js has been updated to follow the player more smoothly:
-
Lookahead: The camera slightly leads the player’s movement, providing a better view of upcoming obstacles.
-
Vertical Movement: The camera adjusts vertically when the player jumps or falls, maintaining a good view of the action.
-
Smoothing: Camera movement is smoothed using exponential interpolation, creating a more natural feel.
-
Clamping: The camera position is clamped to prevent showing areas outside the map boundaries.
Configurable Controls
Section titled “Configurable Controls”In index.html, we’ve added controls that allows one to experiment with various game parameters:
<h2>🕹️ Movement</h2><div class="control"> <label for="maxSpeed"> Max Speed: <span id="maxSpeedValue">150</span> </label> <input type="range" id="maxSpeed" min="0" max="300" step="10" value="150" /></div><!-- More controls... -->These controls are linked to the PlayerConfig and CameraConfig objects in their respective config files. You can adjust values like max speed, acceleration, jump power, and camera behavior in real-time, observing how these changes affect gameplay.
The updatePlayerConfig() and updateCameraConfig() functions in the config files update the game settings when the controls are adjusted. These settings are also saved to localStorage, so you can persist their changes between sessions.
🏃♂️ Mario-3 (The “Stateful Hero” Update)
Section titled “🏃♂️ Mario-3 (The “Stateful Hero” Update)”In this update, we’re refactoring our player character to use a state machine. While this doesn’t add new functionality, it significantly improves our code organization and makes it easier to add new player behaviors in the future.
The State Machine Approach
Section titled “The State Machine Approach”We’re using a state machine to manage the different states our player can be in: idle, walking, jumping, falling, and skidding. Each state encapsulates its own behavior, making our code more modular and easier to understand.
Let’s break down the key components:
-
Player Class (
Player.js):- Now contains a
StateMachineinstance. - Initializes all possible states.
- Delegates update and render calls to the current state.
- Now contains a
-
PlayerState Class (
PlayerState.js):- Base class for all player states.
- Handles common functionality like gravity and collision detection.
-
Specific State Classes (e.g.,
PlayerWalkingState.js,PlayerJumpingState.js):- Inherit from
PlayerState. - Implement state-specific behavior and transitions.
- Inherit from
State Transitions
Section titled “State Transitions”Here’s a diagram showing how the player can transition between different states:
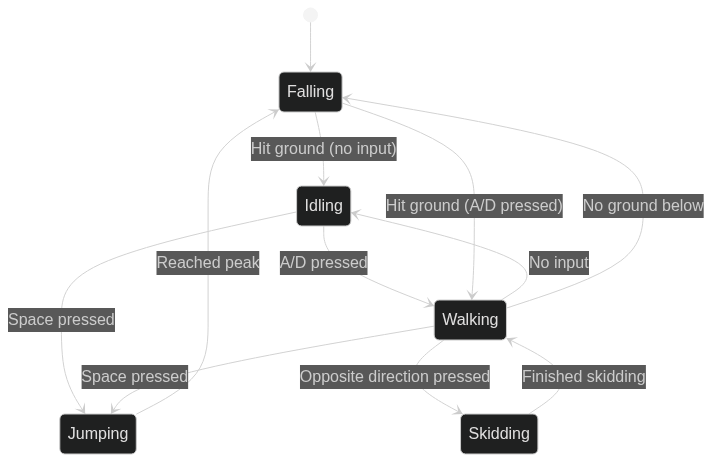
You can click on the diagram to edit it interactively using the Mermaid Live Editor.
Key Changes
Section titled “Key Changes”-
Player.js:
- We’ve removed most of the direct player logic.
- Added a
StateMachineand initialized all states. updateandrendernow simply call the current state’s methods.
-
PlayerState.js:
- Implements common methods like
applyGravityandupdatePosition. - Provides a base
rendermethod for all states.
- Implements common methods like
-
State-Specific Classes:
- Each state (Idle, Walking, Jumping, etc.) now has its own class.
- They implement
enter,exit,update, and state-specific methods. - Responsible for checking and triggering state transitions.
Benefits of This Approach
Section titled “Benefits of This Approach”- Modularity: Each state is self-contained, making it easier to modify or add new states.
- Readability: The code is more organized, with clear separation of concerns.
- Maintainability: Bugs in one state are less likely to affect others.
- Extensibility: Adding new player behaviors (like crouching or swimming) becomes straightforward.
Example: PlayerWalkingState
Section titled “Example: PlayerWalkingState”Let’s look at how the PlayerWalkingState works:
export default class PlayerWalkingState extends PlayerState {  enter() {    this.player.currentAnimation = this.player.animations.walk;  }
  update(dt) {    super.update(dt);    this.handleInput();    this.handleHorizontalMovement();    this.checkTransitions();  }
  checkTransitions() {    if (Math.abs(this.player.velocity.x) < 0.1) {      this.player.stateMachine.change(PlayerStateName.Idling);    }    // ... other transition checks  }}
This state handles walking animation, movement, and checks for transitions to other states like jumping or idling.
By implementing this state machine, we’ve set ourselves up for easier expansion of player capabilities in the future. In the next updates, we’ll be able to add more complex behaviors and interactions with ease, thanks to this modular structure.
🎯 Mario-4 (The “Tile Collision” Update)
Section titled “🎯 Mario-4 (The “Tile Collision” Update)”In this update, we’re introducing a more efficient and precise collision detection system using tile map collisions. This is a significant improvement over our previous AABB (Axis-Aligned Bounding Box) collision system.
AABB checks every object against every other object, which can be slow for many objects. Tile map collisions only check nearby tiles, making it much faster for large levels.
For a more comprehensive understanding of tile map collisions, please read this chapter from the notes.
The CollisionDetector Class
Section titled “The CollisionDetector Class”Our new CollisionDetector class is responsible for handling all collision checks between the player and the tile map. Let’s break it down:
export default class CollisionDetector {  constructor(map) {    this.map = map;  }
  // ... methods here}
The constructor takes a map object, which contains our tile data.
Key Methods:
Section titled “Key Methods:”-
checkHorizontalCollisions(entity):- Checks for collisions on the left or right side of the entity.
- Uses the entity’s velocity to determine which side to check.
-
checkVerticalCollisions(entity):- Checks for collisions above or below the entity.
- Sets
isOnGroundflag when the entity is standing on a tile.
-
isSolidTileInColumn(x, yStart, yEnd)andisSolidTileInRow(y, xStart, xEnd):- Helper methods to check for solid tiles in a vertical column or horizontal row.
- This allows us to check multiple tiles at once, improving efficiency.
How It Works:
Section titled “How It Works:”- We calculate which tiles the entity might be colliding with based on the entity’s position and dimensions.
- We then check those specific tiles for collisions, rather than checking the entire map.
- If a collision is detected, we adjust the entity’s position and velocity accordingly.
For example, in checkHorizontalCollisions:
if (entity.velocity.x > 0) { // Moving right if (this.isSolidTileInColumn(tileRight, tileTop, tileBottom)) { // Collision on the right side entity.position.x = tileRight * tileSize - entity.dimensions.x; entity.velocity.x = 0; }}This code checks if the entity is moving right and if there’s a solid tile in the column to its right. If so, it adjusts the entity’s position and stops its horizontal movement.
Example
Section titled “Example” 0 1 2 3 4 ┌───┬───┬───┬───┬───┐0│ │ │ │ │ │ ├───┼───┼───┼───┼───┤1│ │ ┌─┼─┐ │ │ │ ← Entity at position (48, 32) ├───┼─┼─┼─┼─┼───┼───┤ with dimensions (40, 48)2│ │ └─┼─┘ │ │ │ ├───┼───┼───┼───┼───┤3│ │ │ │ │ │
entity.position.x = 48, entity.position.y = 32entity.dimensions.x = 40, entity.dimensions.y = 48tileSize = 32
tileLeft = floor(48/32) = 1tileRight = floor((48+40)/32) = floor(88/32) = 2tileTop = floor(32/32) = 1tileBottom = floor((32+48)/32) = floor(80/32) = 2Horizontal Collision (Moving Right):
1 2 3 4 ┌───┬───┬███┬───┐1│ ┌─┼─┐ │███│ │ ← Entity moving right ├─┼─┼─┼─┼███┼───┤ hits solid tile at column 32│ └─┼─┘ │███│ │ ├───┼───┼███┼───┤- Check
tileRight = 3for solid tiles - If solid, snap entity to
position.x = 3 * 32 - 40 = 56
Vertical Collision (Falling):
1 2 3 ┌───┬───┬───┐1│ ┌─┼─┐ │ │ ← Entity falling down ├─┼─┼─┼─┼───┤2│ └─┼─┘ │ │ ├███┼███┼███┤ ← Solid ground at row 33│███│███│███│- Check
tileBottom = 3for solid tiles - If solid, snap entity to
position.y = 3 * 32 - 48 = 48
Benefits of This Approach
Section titled “Benefits of This Approach”- Performance: We only check nearby tiles, not the entire map.
- Precision: We can handle collisions on each side of the entity separately.
- Flexibility: Easy to add new types of tiles or collision behaviors.
Debugging Collisions
Section titled “Debugging Collisions”In PlayerState.js, we’ve added a renderDebug method to visualize collisions:
renderDebug(context) { // ... code to render potentially colliding tiles in yellow // ... code to render actually colliding tiles in red // ... code to render player hitbox in blue}This visual debugging is crucial for understanding and fine-tuning our collision system. By implementing tile map collisions, we’ve significantly improved our game’s performance and precision. This system is scalable and will allow us to create more complex levels and gameplay mechanics in the future.
📦 Mario-5 (The “Block” Update)
Section titled “📦 Mario-5 (The “Block” Update)”In this update, we’re adding interactive blocks to our game, similar to the question mark boxes in Super Mario Bros. These blocks can be hit from below and animate when triggered.
Blocks in the Tile Map
Section titled “Blocks in the Tile Map”-
Initial Placement: In the
Mapclass, we’ve added a special tile ID for blocks:if (tileId === Tile.BLOCK) {this.blocks.push(new Block(x * this.tileSize,y * this.tileSize,images.get(ImageName.Tiles)));this.foregroundLayer.setTileId(x, y, Tile.BLANK);}This code identifies block tiles in the map data, creates
Blockobjects, and then replaces the tile with a blank (but solid) tile.
Block as an Entity
Section titled “Block as an Entity”The Block class extends Entity, giving it properties like position and dimensions. It also has its own sprite and hit state:
export default class Block extends Entity { constructor(x, y, spriteSheet) { super(x, y, Tile.SIZE, Tile.SIZE); // ... sprite setup ... this.isHit = false; } // ... other methods ...}Collision Detection Update
Section titled “Collision Detection Update”We’ve updated CollisionDetector to handle blocks specially:
checkBlockCollisionFromBelow(entity, tileY, xStart, xEnd) { for (let x = xStart; x <= xEnd; x++) { const block = this.map.getBlockAt( x * this.map.tileSize, tileY * this.map.tileSize ); if (block && !block.isHit) { const entityTop = entity.position.y; const blockBottom = (tileY + 1) * this.map.tileSize; if (Math.abs(entityTop - blockBottom) < 5) { block.hit(); return true; } } } return false;}This method:
- Checks for blocks in the row above the entity.
- Ensures the entity is hitting from below (within 5 pixels).
- Triggers the block’s
hit()method if conditions are met.
Block Animation
Section titled “Block Animation”When a block is hit, we use tweening to animate it:
async hit() {    if (!this.isHit) {        this.isHit = true;
        await timer.tweenAsync(            this.position,            { y: this.position.y - 5 },            0.1,            Easing.easeInOutQuad        );        await timer.tweenAsync(            this.position,            { y: this.position.y + 5 },            0.1,            Easing.easeInOutQuad        );
        this.currentSprite = this.sprites[1];
        return true;    }
    return false;}
This animation:
- Moves the block up by 5 pixels over 0.1 seconds.
- Moves it back down to its original position.
- Changes the sprite to the “hit” state.
The async/await pattern allows us to sequence these animations smoothly.
👾 Mario-6 (The “Enemy” Update)
Section titled “👾 Mario-6 (The “Enemy” Update)”In this update, we’re adding Goombas to our game, introducing dynamic enemies that interact with both the player and the environment.
Loading Goombas from the Tilemap
Section titled “Loading Goombas from the Tilemap”Similar to blocks, Goombas are initially placed in the tilemap but then converted into dynamic entities:
case Tile.GOOMBA: this.goombas.push( new Goomba( x * this.tileSize, y * this.tileSize, this.tileSize, this.tileSize, images.get(ImageName.Tiles), this ) ); this.foregroundLayer.setTile(x, y, null); continue;We create a new Goomba entity and then set the tile to null. This allows Goombas to move freely without leaving a solid tile behind.
The Goomba Class
Section titled “The Goomba Class”The Goomba class extends the Entity class and includes:
- Movement Logic: Goombas move horizontally and are affected by gravity.
- Collision Detection: They check for ground and wall collisions.
- Animation: A walking animation for movement.
- Interaction with Player: Logic for when a Goomba collides with the player.
Key methods include:
update(dt): Handles movement and animation updates.checkCollisions(): Checks for collisions with the environment.onCollideWithPlayer(player): Determines what happens when a Goomba collides with the player.
Goomba and Player Death
Section titled “Goomba and Player Death”-
Goomba Death:
if (playerBottomQuarter <= goombaTopQuarter) {this.die();}If the player’s bottom quarter is above the Goomba’s top quarter, the Goomba dies.
-
Player Death:
else if (!this.isDead) {player.die();}If the Goomba isn’t dead and collides with the player, the player dies.
The player’s die() method just resets their position:
die() { this.position.set(this.initialPosition.x, this.initialPosition.y);}But you could expand this to include a death animation, game over screen, or other logic.
New Debug Globals
Section titled “New Debug Globals”We’ve added several debug options to help with development and testing:
export const debugOptions = { mapGrid: false, cameraCrosshair: false, playerCollision: false, watchPanel: false,};mapGrid: When true, renders a grid overlay on the map.cameraCrosshair: Displays the camera’s center and lookahead position.playerCollision: Shows a blue outline around the player’s collision box, highlights potential collisions in yellow, and actual collisions in red.watchPanel: Toggles a debug panel with live game data.
These options are toggled via checkboxes in the UI and saved to localStorage:
export function toggleDebugOption(option) { debugOptions[option] = !debugOptions[option]; localStorage.setItem(`debug_${option}`, debugOptions[option]);}This way, the debug settings persist between sessions.
And with that, we have a fully functioning game of Mario!