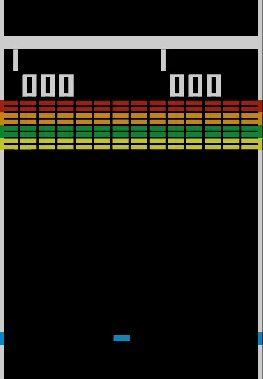
🧱 Breakout
Originally developed by Atari in 1976. An effective evolution of Pong, Breakout ditched the two-player mechanic in favor of a single-player game where the player, still controlling a paddle, was tasked with eliminating a screen full of differently placed bricks of varying values by deflecting a ball back at them.
🎯 Objectives
Section titled “🎯 Objectives”- Images (Sprites): How can we load images from memory to our game and draw them on the screen?
- Sprite Sheets: Allows us to condense all the images we need to load for our game into one big image, with each sprite assigned a specific area in the sheet.
- State Machines: Last week we used a rudimentary “state machine” for pong, which was really just a string variable and a few if statements in our
update()function. This week we’ll see how we can actually use a state machine class to allow us to transition in and out of different states more cleanly, and abstract this logic away from our main.js file and into separate classes. - Procedural Layouts: We’ll take a look at how to dynamically generate bricks layouts so that no two levels are the same.
- Levels: We’ll introduce the concept of “levels” to our game, allowing a player to progress and change what we’re displaying to the screen accordingly.
- Player Health: We’ll learn how to keep track of player “health” using hearts to give them a number of chances before losing the game.
- Collision Detection Revisited: Collision detection will be a bit more advanced this week.
- Persistent Save Data: In the context of high scores, it’s useful to know how to save information relevant to our game so that the next time we open it, we can still access that old information.
- Music: Similarly to how we added sound effects to our game last week, we’ll see how to add music to our game this week and ensure that it loops during game execution.
- Particle Systems: We’ll learn more about particle systems this week to provide more aesthetically pleasing qualities to our game.
🔨 Setup
Section titled “🔨 Setup”-
Clone the repo (or download the zip) for today’s lecture, which you can find here.
-
Open the repo in Visual Studio Code.
-
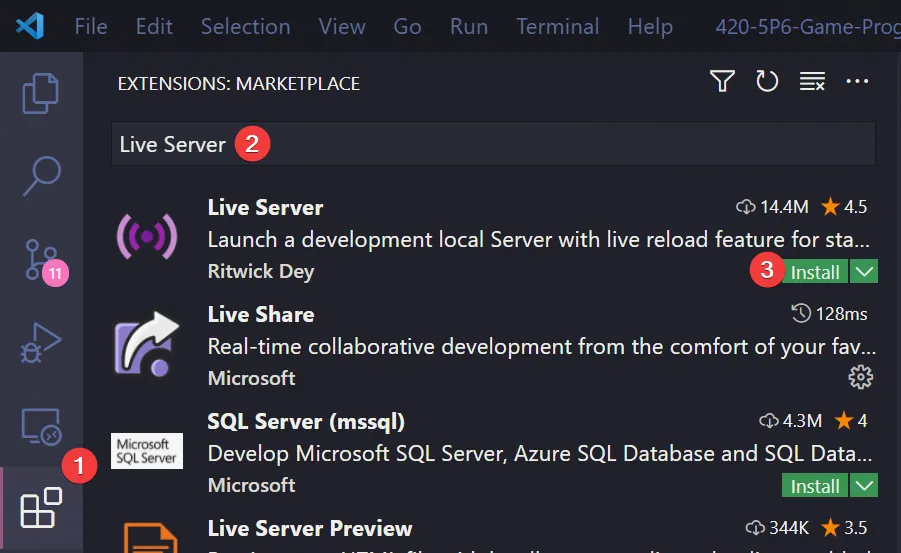
Start Visual Studio Code’s “Live Server” extension. If you don’t have it installed:
-
Click on the extensions icons in the left-hand side navigation.
-
Search for “Live Server”.
-
Click install next to the extension by “Ritwick Dey”. You may have to reload the window.
-
Once it’s installed, click “Go Live” on the bottom right of the window. This should start the server and automatically open a new tab in your browser at
http://127.0.0.1:5500/(or whatever port it says on your machine).- The files the server serves will be relative to the directory you had open in VSC when you hit “Go Live”.
-
🌅 Breakout-0 (The “Day-0” Update)
Section titled “🌅 Breakout-0 (The “Day-0” Update)”Breakout-0 displays the title screen and allows the user to toggle between the “Start” and “High Score” options.
State Machines
Section titled “State Machines”A state machine is a mechanism through which we handle the different “screens” (i.e. states) of our game. When you start your favourite game, you’re usually not thrown right into the game itself. Rather, you’re presented with a title screen that gives you a menu with options. When you select one of those options, you’re taken to a different “screen” in the game.
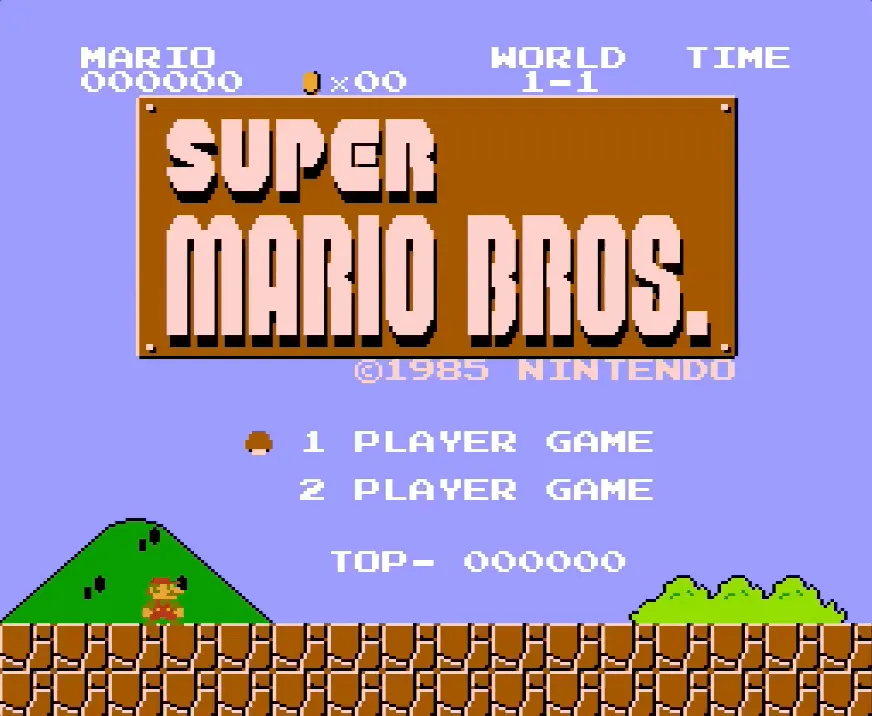
An example of one of the most well known title screens from Super Mario Bros.
Here’s the state diagram we’re going to use for the final version of Breakout:
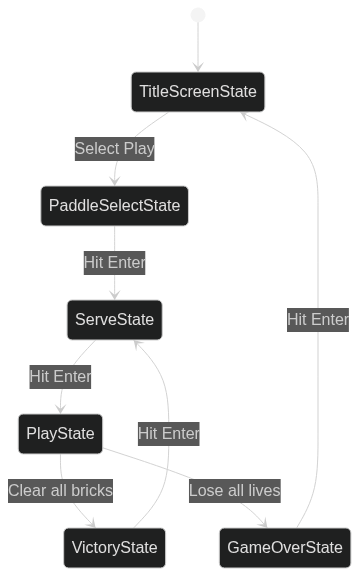
- The program will begin in
TitleScreenState, which can transition back and forth between itself andHighScoreState(since the user can check high scores before playing). TitleScreenStatecan also transition toPaddleSelectState, which transitions on toServeState.- During gameplay, the program will transition back and forth between
ServeStateandPlayStateas the user loses health. If the user clears the level, the program transitions onto theVictoryStateand then to theServeStatefor the next level. - Alternatively, if the user loses all their lives before clearing the level, the program will transition from
PlayStatetoGameOverState, optionally transitioning to theEnterHighScoreState(if the user achieves a high score) and then on to theHighScoreState, or transitioning fromGameOverStatetoTitleScreenStateif the user does not have a high score.
Important Code
Section titled “Important Code”- We will manage all our game states using an overarching
StateMachine.jsclass, which handles the logic for initializing and transitioning between them. State.jsis an abstract base class for the other states - it defines empty methods and passes them on to its children via inheritance.- In
globals.jswe define our state machine and inmain.jswe populate it with states. The last state added is always set as the current state. - Currently in the
src/statesdirectory, we only haveTitleScreenState.js:update(): Allows the user to toggle between “Start” and “High Scores” on the screen, highlighting their selection and playing a toggle sound effect.render(): Includes some graphics configurations specific to theTitleScreenState.
- Also in
globals.js, we initialize oursoundsobject. Notice that instead of declaringnew Audio()objects like we did last week, we’re now declaringnew SoundPool()objects. If you take a look inSoundPool.js, you’ll find a class that takes care of keeping an array (i.e. “pool”) of sounds. The reason this is necessary is so that we can have multiple of the same sound play even when that sound is currently playing.- To see this in action, uncomment line 21 in
globals.jsand comment line 22. In the browser, hold down eitherworsand notice that the sound only starts to play again when the previous iteration of the sound is done. This is why we need a pool of sounds.
- To see this in action, uncomment line 21 in
- Finally in
globals.js, we initialize ourimagesobject. Notice that instead of declaringnew Image()objects, we’re declaringnew Graphic()objects. If you take a look inGraphic.js, you’ll find a class that takes care of wrapping the JS image API. One advantage of doing this is so that we can declare our image’s size and source at the same time, instead of doing it separately. - Be sure to read through each file carefully so as to understand its role in the overarching project. The code itself should look familiar, but do take the time to familiarize yourself with the organizational layout.
👾 Breakout-1 (The “Sprite” Update)
Section titled “👾 Breakout-1 (The “Sprite” Update)”Breakout-1 takes advantage of “sprite sheets” in order to render a paddle sprite during PlayState.
What is a Sprite Sheet?
Section titled “What is a Sprite Sheet?”A Sprite Sheet is an image containing smaller images (i.e. “sprites”) within itself. A sprite sheet can be split into “sprites”, that is, rectangular sections of itself (each encapsulating a single sprite), so that instead of having multiple image files in our project for each sprite, we can more efficiently use a single file that we section out into sprites when rendering a particular sprite.
![]()
When an artist creates a sprite sheet, they usually do so with a tile size in mind. This tile size is a pixel value that denotes the width and height of one tile in the sheet. Here’s the same sprite sheet broken up into tiles:
![]()
The tile size of this particular sheet is 16 pixels. Meaning, each square above is 16 pixels wide by 16 pixels high. We can use this value to extract each individual sprite from the sheet in our code.
Important Functions
Section titled “Important Functions”SpriteManager.generatePaddleSprites()- This function extracts the paddle sprites from the main sprite sheet.
Sprite::render(x, y)- The sprite object contains the
xandycoordinates of where the sprite is located in the sprite sheet image. Thexandythat we pass to this render function is the location we want to draw the sprite on the canvas.
- The sprite object contains the
Important Code
Section titled “Important Code”TILE_SIZEis a constant declared inglobals.jsthat defines the size of one tile in the sprite sheet. In this case, one “tile” is 16 pixels wide and 16 pixels tall.Paddle.js- Contains all the updating and rendering logic for our paddle.
PlayState.jsupdate()allows the user to pause the game and move the paddle.render()calls the paddle’s ownrender()method and also displays paused text ifthis.pausedis true.
⛹️♀️ Breakout-2 (The “Bounce” Update)
Section titled “⛹️♀️ Breakout-2 (The “Bounce” Update)”Breakout-2 uses AABB Collision Detection so that the ball can bounce when it collides with the paddle or the walls.
Important Code
Section titled “Important Code”- In
SpriteManager.jsyou’ll notice that we’ve added a method to extract the ball sprites from the sprite sheet.- In this function, we’re finding the offset for our ball sprites in our sprite sheet and looping over it, generating
Spriteobjects for the balls as we go. This is the same function for how we extracted our paddle sprites.
- In this function, we’re finding the offset for our ball sprites in our sprite sheet and looping over it, generating
- Read through
Ball.js, which creates ourBallclass:constructor()initializes the ball’s position, size, velocity, colour and sprites.didCollide()checks for collisions using AABB Collision Detection.reset()resets the ball to the middle of the screen.update()implements behavior for bouncing off walls.render()renders the ball to the screen.
- Again, we conclude with some additions to
PlayState.js:constructor()now instantiates a ball.update()calls the ball’s update method and naively implements behavior for bouncing off the paddle. Can you think of a potential issue with our implementation? (Hint: think about what else we might want to do besides reversing the ball’s velocity). You might be able to observe the issue by trying to bounce the ball off the paddle at an angle.render()calls the ball’srender()method.
🧱 Breakout-3 (The “Brick” Update)
Section titled “🧱 Breakout-3 (The “Brick” Update)”Breakout-3 renders bricks onto the screen. It implements bouncing behavior for the ball upon a collision with a brick. It also fixes our previous naive implementation of bouncing behavior between the ball and the paddle.
Important Algorithms
Section titled “Important Algorithms”We want the player to control the trajectory of the ball based on where it hits the paddle. If the ball hits the center of the paddle, the ball should slow down and have a steeper angle. If the ball hits more towards the edges of the paddle, the ball should speed up and have a shallower angle. The code for this is explained in the next section.
For brick collision, we must check which edge of the ball is not inside the brick:
if left edge of ball is outside brick and dx is positive: trigger left-side collisionelse if right edge of ball is outside brick and dx is negative: trigger right-side collisionelse if top edge of ball is outside brick: trigger top-side collisionelse trigger bottom-side collisionThis is a fairly simple collision algorithm, so it is not the most accurate, particularly when faced with corner-cases, but it works 99% of the time. For a more robust solution, check out this alternative method.
Important Code
Section titled “Important Code”-
In
SpriteManager.jsyou’ll notice that we’ve added another method,generateBallSprites(), to extract the brick sprites from the sprite sheet. -
Brick.jscreates our brick class:constructor()initializes a brick. Importantly, we include aninPlayflag to serve as a signal for whether a brick is still in play or if it should disappear from the screen. In the context of this Breakout game, this is an effective shortcut, but do note that in larger programs, it would be better practice to free memory that is not being used instead of just hiding it from view.hit()hides a brick by toggling theinPlayflag tofalse.render()renders a brick to the screen.
-
PlayState.jsreferences a new class,LevelMaker.js, which encapsulates all the logic for generating new levels (i.e. different layouts for the bricks). It also checks for collisions between the ball and the bricks, hiding bricks as needed, and renders the “in play” bricks to the screen. -
To create a level,
LevelMaker.jsrandomly generates an array of bricks that can be rendered to the screen. Read through theLevelMaker.createMap()function carefully. -
In
Ball.js, we’ve added anhandlePaddleCollision()function to reflect the collision algorithms mentioned above:Ball.js const paddleBallDistance = paddle.x + paddle.width / 2 - this.x;const scaleFactor = 8;const minimumVelocity = 50;if (this.x < paddle.x + paddle.width / 2 && paddle.dx < 0) {this.dx = -minimumVelocity + -(scaleFactor * paddleBallDistance);} else if (this.x > paddle.x + paddle.width / 2 && paddle.dx > 0) {this.dx = minimumVelocity + scaleFactor * Math.abs(paddleBallDistance);}- First, we calculate the distance between the paddle and the ball to scale the ball’s
dx. scaleFactorandminimumVelocityare values that are used to control the ball’sdxdepending on where it hit the paddle.- Then perform this operation on either side of the paddle based on the paddle’s
dx. If on the right side, the differential will be negative, so we need to callMath.abs()to make it positive, then scale it by a positive amount sodxbecomes positive.
- First, we calculate the distance between the paddle and the ball to scale the ball’s
-
And below that, we’ve added a
handleBrickCollision()function based on the pseudocode in the section above. We slightly increase the ball’s velocity after a collision:Ball.js if (this.x < brick.x && this.dx > 0) {this.dx = -this.dx;} else if (this.x + this.width > brick.x + brick.width && this.dx < 0) {this.dx = -this.dx;} else if (this.y < brick.y) {this.dy = -this.dy;} else {this.dy = -this.dy;}this.dy *= 1.02;
💜 Breakout-4 (The “Hearts” Update)
Section titled “💜 Breakout-4 (The “Hearts” Update)”Breakout-4 implements the idea of “health” for the user, which is displayed on the screen as hearts.
Important Code
Section titled “Important Code”-
Notice that in
TitleScreenState.js, when we transition toServeState, we are passing along paddle, bricks, health, and score throughstateMachine:change(). This design is cleaner since it allows us to remove unnecessary values from our files. For example, it makes sense to have a paddle and bricks when we are inServeState, but not so much when we are inHighScoreState. -
On that note, take a look at
ServeState.js, which serves (😜) a very similar purpose to theServeStatefrom Pong. The code should look familiar, as all we’re doing here is providing a state in which the user can hit the enter key to transition to thePlayState. -
In
globals.jsyou’ll notice we’ve added hearts to ourimagesobject. This is used in the newUserInterfaceclass for rendering the user’s health on the screen. It simply draws the corresponding number of full hearts followed by empty hearts per the user’s health.UserInterface.js let healthX = CANVAS_WIDTH - 130;const sprites = SpriteManager.generateHeartSprites();for (let i = 0; i < this.health; i++) {sprites[0].render(healthX, 12);healthX = healthX + 11;}for (let i = 0; i < 3 - this.health; i++) {sprites[1].render(healthX, 12);healthX = healthX + 11;} -
PlayState.jsnow also takes care of keeping score, monitoring the user’s health, and transitioning to other States as needed. You should be able to find the health-tracking code inPlayState::update(), which simply decreases health and reverts toServeStatewhen the ball goes past the paddle beyond the bottom of the screen:PlayState.js if (this.ball.didFall()) {this.health--;sounds.hurt.play();if (this.health === 0) {stateMachine.change('game-over', {score: this.score,});} else {stateMachine.change('serve', {paddle: this.paddle,ball: this.ball,bricks: this.bricks,health: this.health,score: this.score,userInterface: this.userInterface,});}} -
The score tracking can also be found in
PlayState::update(), where we simply add 10 points to the score every time a ball/brick collision is detected. -
GameOverState.js, which is unsurprisingly called when the user loses all health, simply renders a “Game Over” screen with the final score. When a user presses the enter key in this state, they’re taken back to theTitleScreenState.
⏩ Breakout-5 (The “Progression” Update)
Section titled “⏩ Breakout-5 (The “Progression” Update)”Breakout-5 updates the levels to include different colours and layouts of bricks. The player can now beat a level and progress to the next. We also now differentiate between the different tiers of bricks, making updates to the gameplay and the scoring as a result.
Important Code
Section titled “Important Code”-
We’ve made a few modifications to
LevelMaker.jsin order to allow for a more varied gaming experience.- The changes mostly consist of adding some new flags so that we can display different colours and layouts for our bricks.
- Read through the changes to this file carefully, paying special attention to the comments, to understand how we are generating our new brick layouts.
-
Take a look at
Brick.js. You’ll notice that we’ve updated thehit()method such that it only toggles theinPlayflag if the brick being hit is of the lowest tier. Otherwise, it simply decrements the tier of the brick.Brick.js if (this.tier > 0) {this.tier--;} else {this.inPlay = false;}- The tier of the brick just means how many hits that brick will take to break.
-
We also use the tier to calculate which brick sprite to render:
Brick.js this.sprites[this.colour * (this.numberOfColours - 1) + this.tier].render(this.x,this.y); -
In
PlayState.js, we’ve updated the scoring algorithm to attribute higher values to bricks of higher tiers. Whereas previously we always added 10 points for any ball/brick collision, we now take tier into account:PlayState.js this.score += this.baseScore * (brick.tier + 1); -
You’ll notice in
TitleScreen.jsthat we are now passing in an additional field toServeStateupon transition, namely,level.- We’ll continue to do this once each level has been beaten, incrementing level as needed.
- In
PlayState.js, we’ve written a new method,checkVictory(), that checks if the current level has been beaten, by checking if every brick’sinPlayflag has been toggled tofalse. - This method is called within
Playstate::update(), since it makes sense to check if the level has been beaten each time a brick is hit.
-
VictoryState.jscontains the code for producing our victory screen. It is only ever activated when the user beats a level. This is also where we increment the value oflevel. Upon increasing the level, we must generate a new brick layout:VictoryState.js stateMachine.change('serve', {ball: this.ball,bricks: LevelMaker.createMap(this.level + 1),paddle: this.paddle,health: this.health,score: this.score,userInterface: this.userInterface,level: this.level + 1,});- Notice that we’re also passing the incremented level into
LevelMaker.createMap()so that we can get higher tier bricks on higher levels.
- Notice that we’re also passing the incremented level into
🎉 Breakout-6 (The “High Score” Update)
Section titled “🎉 Breakout-6 (The “High Score” Update)”Breakout-6 introduces the ability to add and view high scores. For our storage mechanism, since we’re in the browser, we can use local storage. Local storage is a simple way to store small key/value pairs (kind of like cookies) for a particular domain on your browser. Read more about local storage here.
Important Functions
Section titled “Important Functions”localStorage.getItem(key)- Gets a key/value pair from the browser’s local storage by the key.
localStorage.setItem(key, value)- Sets a key/value pair to the browser’s local storage with the provided key and value.
JSON.parse(string)- Takes a string containing valid JSON and converts it to a JavaScript object.
JSON.stringify(object)- Takes a JavaScript object and converts it to a string containing valid JSON.
Important Code
Section titled “Important Code”- In
HighScoreManager.js, we have two new functions:loadHighScores(): Loads existing high scores from the browser’s local storage.- If the key doesn’t exist, we create it and fill it with 10 placeholder names and scores.
addHighScore(): Adds a new high score to the browser’s local storage.
- These functions are used by
HighScoreState,GameOverState, andEnterHighScoreState, so have a look at those three files and make sure you understand how the high scores are being handled. - In
EnterHighScoreState.js, we allow users to enter their high scores by choosing a 3-character name. The name is selected by toggling the 3 characters using thew,a,s,dkeys. We use ASCII values to implement this behavior.- Once the user settles on a name, we write their score to local storage using
HighScoreManager, taking care to only store the top 10 scores.
- Once the user settles on a name, we write their score to local storage using
🏓 Breakout-7 (The “Paddle Select” Update)
Section titled “🏓 Breakout-7 (The “Paddle Select” Update)”Breakout-7 introduces a new state that allows the user to select a paddle skin before starting the game.
Important Code
Section titled “Important Code”- In
PaddleSelectState.js, we render a new screen to the user which contains some text, a left arrow, a right arrow, and a paddle. - The user can toggle between paddles using
aanddand can make a selection by pressing enter. - Notice that this state is now in charge of transitioning over to
ServeStateand passing along the relevant values instead ofTitleScreenState.
✨ Breakout-8 (The “Polish” Update)
Section titled “✨ Breakout-8 (The “Polish” Update)”Breakout-8 implements a rudimentary particle system to create a nicer visual effect when the ball collides with a brick. For a fantastic introduction to particles, please watch this video from The Coding Train. As the final update, we’re also adding music.
Important Code
Section titled “Important Code”- In
Particle.jswe define a class that represents one tiny particle in the game. Each particle has its own position, velocity, and acceleration. We can manipulate these values to achieve a little “explosion” effect in the game when a brick is hit. - In the
constructor()ofBrick.js, we define a new array ofparticlesthat will be populated inhit()and acoloursarray of RGB values corresponding to the blue, green, red, purple, and gold colours of our bricks from the sprite sheet.- In
hit(), we then usecoloursto set the colour when instantiating new particle objects. - In
update()andrender(), we make sure every particle gets updated and drawn to the screen according to each particle’s individuallifevalue. - Make sure to now call
brick.update(dt)inPlayState.js.
- In
- Finally, we add some music to the game in
globals.jsby adding the music track to oursoundsobject (notice thetruefor looping) and callingsounds.music.play()inmain.js.
And with that, we have a fully functioning game of Breakout!