Assignment 4: Zelda
- 💯 Worth: 6%
- 📅 Due: See due date on Moodle.
- 🚫 Penalty: Late submissions lose 10% per day to a maximum of 3 days. Nothing is accepted after 3 days and a grade of 0% will be given.
🎯 Objectives
Section titled “🎯 Objectives”- Read and understand all of the Zelda notes and source code.
- Implement hearts that sometimes drop from enemies at random, which will heal the player for a full heart when picked up (consumed).
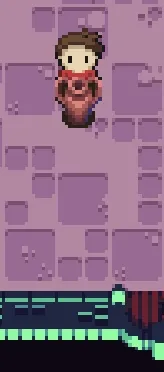
- Add pots to the dungeon rooms at random that the player can pick up, at which point their animation will change to reflect them carrying the pot (shown in the character sprite sheets). The player should not be able to swing their sword when in this state.
- When carrying a pot, the player should be able to throw the pot. When thrown, the pot will travel in a straight line based on where the player is looking. When it collides with a wall, travels more than four tiles, or collides with an enemy, it should disappear. When it collides with an enemy, it should do 1 point of damage to that enemy as well.
🔨 Setup
Section titled “🔨 Setup”- Fork (do not download as a zip) the starter repository from GitHub. Make sure you use the link from Moodle to fork the proper repository for this assignment.
- Start Live Server in VSC by right-clicking on
index.htmland selecting Open with Live Server. This will open a new tab in your browser with the game running. - If you have an ad blocker, turn it off for localhost or else the game won’t load properly.
🔍 Context
Section titled “🔍 Context”To complete this assignment, you should read and understand all of the Zelda notes and source code and be familiar with the following concepts:
- Hitboxes: Understanding how to detect collisions with hitboxes.
- Y-sorting: Understanding how entities are rendered in the correct order in a top-down game.
- Factories: Understanding the factory design pattern and how to use it in your game.
Welcome to your fifth assignment! We’ve explored the workings of a top-down adventure game in the style of Legend of Zelda and have a fair foundation for anything resembling it, be it a dungeon crawler or a vast 2D game featuring an overworld and the like. Let’s add a few pieces to this sample in order to pay homage to some of the classic Zelda titles and to give our character a shot at actually surviving their trek through the dungeon!
✅ Requirements
Section titled “✅ Requirements”💕 Hearts (20%)
Section titled “💕 Hearts (20%)”Implement hearts that sometimes drop from vanquished enemies at random, which will heal the player for a full heart (two health points) when picked up (consumed).
Recall that all instances of Entity have a health field, including the Player. The health of the Player is measured numerically but represented via hearts where one heart is two points of health and one half-heart is one point of health. Therefore, when we want to heal the Player for a full heart, be sure to increment health by 2, but be careful it doesn’t go above the totalHealth!
❤️ Hearts are randomly dropped from killing enemies.
Section titled “❤️ Hearts are randomly dropped from killing enemies.”| Deduction | Criteria | Details |
|---|---|---|
| (-0) | Correct | Hearts occasionally appear after defeating an enemy. |
| (-1) | Hearts drop 100% of the time. | Defeat multiple enemies to check if hearts spawn every time or only sporadically. |
| (-X) | Other reason detailed in comments. | |
| (-3) | N/A |
🍽️ Player can consume the hearts for health.
Section titled “🍽️ Player can consume the hearts for health.”| Deduction | Criteria | Details |
|---|---|---|
| (-0) | Correct | Collecting a heart successfully restores health. |
| (-1) | Heart does not heal the player for exactly 2 health points. | Allow the player to get hurt, then collect a heart and verify the exact health restoration. |
| (-X) | Other reason detailed in comments. | |
| (-3) | N/A |
💯 Player cannot go over their max health.
Section titled “💯 Player cannot go over their max health.”- Take one hit so that you’re at 2 and a half hearts.
- Consume a heart so that you’re at 3 hearts.
- Take another hit and see if the player goes down to 2 and a half hearts. If they’re still at 3 hearts, it likely means that the player went to 3 and a half hearts when they consumed the heart.
| Deduction | Criteria | Details |
|---|---|---|
| (-0) | Correct | Verify that health cannot exceed the maximum heart count. |
| (-1) | Player can go over their max health. | Consume multiple hearts and monitor if health exceeds the intended maximum limit. |
| (-1) | Other reason detailed in comments. | |
| (-2) | N/A |
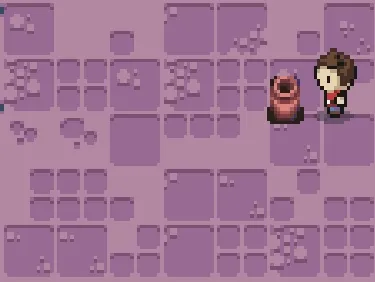
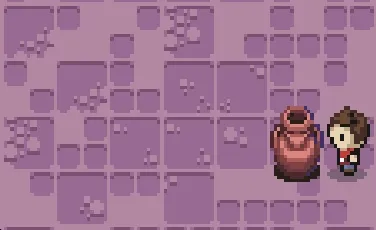
🍯 Pots (70%)
Section titled “🍯 Pots (70%)”Add pots to the dungeon rooms at random that the player can pick up and throw. The pots should be solid, meaning, the player should not be able to walk through them just like with the Block from Mario.
The sprites for the pots can be found in assets/images/pots.png. You don’t have to implement all three sizes, just one is fine. Also, notice how the player can move behind the pot and doesn’t simply collide with the top of the pot sprite. This is acheived by using a hitbox for the pot that is smaller than its sprite, similar to how it’s being done for the player.
🏋️♀️ Lifting
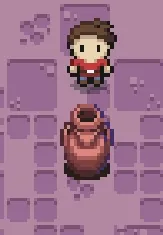
Section titled “🏋️♀️ Lifting”When the player is facing a pot that is in directly in front of them, they should be able to hit the enter key to pick up the pot. While the lifting animation is playing, the pot’s position should be tweened to above the player’s head to make it appear as if the player lifted the pot and is holding the pot above their head.
- The sprites for this animation can be found in
assets/images/player_lift.png. - Ensure that the player can only lift the pot if they are directly facing it. You can use the
directionproperty of thePlayerto determine which direction they are facing.
| Deduction | Criteria | Details |
|---|---|---|
| (-0) | Correct | Test pot-lifting mechanics by attempting to lift pots in different directions. |
| (-1) | Pot is not positioned above the player accurately. | Check if the pot appears centered above the player during lifting. |
| (-1) | Lifting animation is not reset after first lift. | Lift and drop the pot multiple times to observe if the animation resets correctly. |
| (-2) | Pot is rendered behind the player instead of in front. | Lift the pot and ensure it is rendered in front of the player, not hidden behind. |
| (-2) | Pot can be lifted if player is not directly facing the pot. Ex:  | Approach the pot from different angles to verify it can only be lifted when the player is facing it directly. |
| (-2) | Pot lift is not tweened properly. | Observe the pot’s lift for smooth movement from ground to above player’s head. |
| (-2) | Pot cannot be lifted from all directions. | Attempt lifting the pot from each direction: above, below, left, and right of the player. |
| (-4) | Lifting animation plays but pot is not actually lifted. | Check if the pot remains stationary despite the lift animation playing. |
| (-X) | Other reason detailed in comments. | |
| (-8) | N/A |
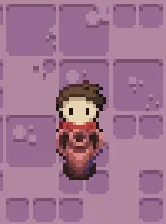
🤰 Carrying
Section titled “🤰 Carrying”After the player has lifted the pot above their head, they should be able to carry it around.
- The sprites for this animation can be found in
assets/images/player_carry.png. - This will entail not only adding some new states for the
Playerbut also ensuring a link exists (pun intended 🧝♂️) between the pot and the character such that the pot always tracks the player’s position so it can be rendered above their head. - When the player is in this state, they should not be able to swing their sword since their hands are full at the moment!
| Deduction | Criteria | Details |
|---|---|---|
| (-0) | Correct | Carry the pot across the room to ensure it stays with the player and doesn’t disconnect. |
| (-1) | Pot is rendered behind the player instead of in front. | Confirm the pot appears in front of the player during movement. |
| (-2) | Pot moves but does not follow the player directly. | Move the player in various directions to ensure the pot accurately follows all movements. |
| (-3) | Carrying animation plays but pot cannot be carried. | Check if the pot remains stationary even though the carrying animation is playing. |
| (-X) | Other reason detailed in comments. | |
| (-6) | N/A |
🏀 Throwing
Section titled “🏀 Throwing”While carrying a pot, the player should be able to hit the enter key again to throw the pot in front of them. When thrown, the pot should travel in a straight line based on which direction the player is facing.
| Deduction | Criteria | Details |
|---|---|---|
| (-0) | Correct | When the pot breaks, the shatter animation and sound should play immediately. |
| (-1) | Pot collision does not play a shatter animation. | Break a pot and verify the shatter animation triggers on impact. |
| (-1) | Pot collision does not play a sound effect. | Ensure the sound effect is audible immediately upon pot shattering. |
| (-1) | Animation and/or sound plays before the pot collides. | Check if the animation or sound occurs prematurely; they should align with the impact moment. |
| (-1) | Other reason detailed in comments. | |
| (-3) | N/A |
If the pot travels more than X tiles worth of distance, determined by you, it should break:
If the pot hits a wall, it should break:
If the pot hits an enemy, it should break:

- The sprites for this animation are exactly the same as the one for lifting only played in reverse. Think about how you can specify the frames of a
new Animation()to play something in “reverse”. - Upon collision with an enemy it should deal 1 damage to the enemy which, if the enemy only has 1 health, should kill them.
- When the pot breaks, it should play the breaking animation (also provided in the sprite sheet) as well as play a shattering sound effect (
assets/sounds/shatter.wav).
| Deduction | Criteria | Details |
|---|---|---|
| (-0) | Correct | Throw the pot at a(n) enemy/wall/distance to verify if it breaks properly. |
| (-1) | Pot cannot be thrown in all directions. | Try throwing the pot in each direction (up, down, left, right) to ensure it collides correctly. |
| (-1) | Pot teleports instead of smoothly travels when thrown. | Check if the thrown pot follows a smooth path rather than instantly teleporting to the enemy. |
| (-X) | Other reason detailed in comments. | |
| (-4) | N/A |
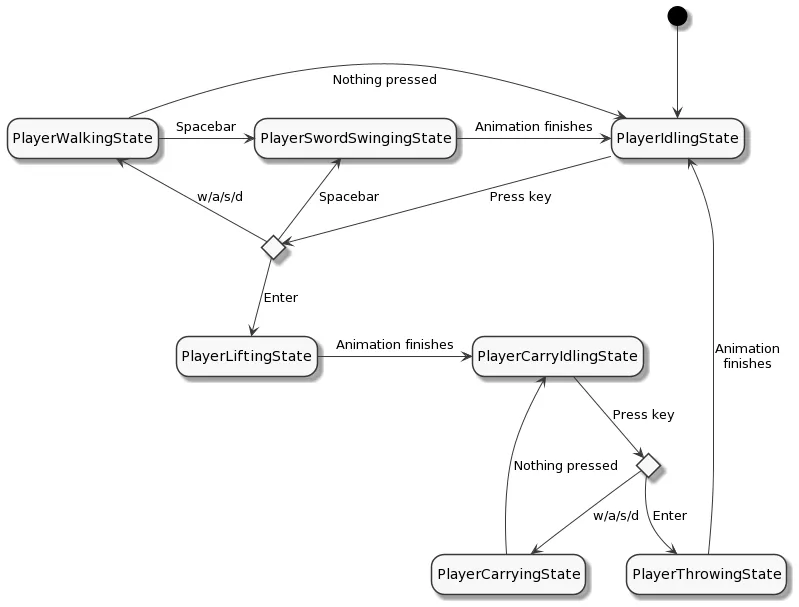
🤖 State Diagram
Section titled “🤖 State Diagram”You don’t have to design your game like this, but here’s an example of how the player’s state machine might work:
💡 Work Smarter
Section titled “💡 Work Smarter”- You’re going to be starting the game over and over and over again, dozens of times. Instead of going through the title screen every time you refresh, make it so that you start in the play state from the outset.
- When testing a particular feature you’re implementing, hardcode the parameters to work to your advantage.
- For example, before making the hearts random, make them drop 100% of the time. Once you know that’s working, then make them drop randomly.
- Or, when implementing pots, always have one spawn right next to the player so you don’t have to walk across the room to pick one up every time. Make the locations random at the end!
- Enable the
debugboolean inglobals.jsto see the hitboxes of the pots and hearts.
Taking the time at the beginning to set up your game in a state that is conducive to testing will save you tons of time down the road - trust me! And this isn’t just for game programming, this goes for any type of development you do. 😉
📝 Dev Log (5%)
Section titled “📝 Dev Log (5%)”You’ll find a .devlog.md file in the project root. This file is your design diary. It’s where you document how you approached the assignment, what decisions you made, what challenges you encountered, and how you worked through them, including how you used any AI tools.
This is not a summary of your final product (that’s what your code and commit messages show). Instead, it’s a reflection of your process and thinking.
What to write:
- What approach you chose and why
- Any bugs or roadblocks you encountered and how you solved them
- How you tested and verified your implementation
- If you used AI tools (e.g. ChatGPT, Claude, Copilot), describe:
- What you asked
- What it returned
- What you kept or changed
- Include links to relevant chat logs when possible
What makes a good devlog:
- Specific technical insights (e.g. “I struggled with connecting the AI paddle’s movement to the ball’s position. I solved this by…”)
- Honest reflection on what you understood and what confused you
- Commentary on any AI output you received, what was useful, what wasn’t
What makes a weak devlog:
- Restating the assignment prompt
- Only describing what the final code does, without process
- Hiding or omitting AI tool usage
- Generic statements with no technical substance
Be concise. Bullet points are fine.
| Criteria | Standard |
|---|---|
| Process Reflection | Clear explanation of approach, design decisions, and problem-solving steps |
| Technical Detail | Specifics about code structure, logic, or bugs encountered and fixed |
| AI Usage Disclosure | Clearly explains how AI was used, what was kept/changed, with reasoning |
| Insight & Critical Thinking | Thoughtful reflection on what was learned, understood, or found challenging |
| Clarity & Format | Concise, readable, well-structured with bullet points or short paragraphs |
🤖 AI Involvement Category
Section titled “🤖 AI Involvement Category”At the top of your .devlog.md, you must declare your AI involvement category by selecting the option that best describes how you used AI during the assignment:
| Category | Description |
|---|---|
| No Use | You did not use any AI tools at any point. |
| Tutor | You used AI to explain code, concepts, or errors. No code was generated by AI. |
| Assistant | You asked AI for code suggestions or snippets and integrated them with understanding. |
| Reviewer | You wrote the code yourself, then used AI to review, critique, or suggest improvements. |
💬 Peer Assessment (5%)
Section titled “💬 Peer Assessment (5%)”You’ll use the Moodle Workshop feature to give feedback on 3 of your peers’ submissions. Peer assessment is a core developer skill. Reading others’ code and giving constructive feedback is something you’ll do constantly in real software teams. It also helps you improve your own work by seeing how others solved the same problem.
💻 Code Walkthrough
Section titled “💻 Code Walkthrough”For each assignment, I will randomly select a few students for a short (10-15 minute) one-on-one code walkthrough. You’ll be asked to explain your implementation, reflect on your design decisions, and answer a few questions. This helps ensure understanding, promotes academic integrity, and prepares you to communicate your work which is an essential skill for every developer. You can be selected for any assignment, so always be ready to walk me through your code.
We will be using GitHub and Gradescope to submit in this course. You can use either the Git CLI or you can also use VSC’s built-in Git GUI client.
| Visual Studio Code (GUI) | Command Line (CLI) | |
|---|---|---|
| 1 | Click the Source Control icon (third down on the left sidebar) | git status - View changed files |
| 2 | Click + to stage all changes, or + next to individual files | git add . or git add <filename> - Stage changes |
| 3 | Type a commit message in the text box, then click the ✔ to commit | git commit -m "Your message" - Commit staged changes |
| 4 | Click ... and choose Push to upload your commit to GitHub | git push - Push commits to GitHub |
Commit frequently. It’s good practice, and it also creates a traceable history of your progress.
📥 Submission
Section titled “📥 Submission”Before submitting your assignment, ensure that your map includes all the necessary elements for your peers to properly evaluate your submission. Ensure all relevant features are included and testable in your map, and describe them clearly when you submit.
- Go to Gradescope, click the link for this assignment, select the correct repository and branch from the dropdown menus, and click
Upload. - Go to Moodle and click the link for this assignment in the calendar.
- Click the blue
Add Submissionbutton at the top of the workshop page.- Title: A4 Zelda Submission.
- Submission content: Describe which features you implemented in the description of the workshop submission along with anything your reviewers should know about your game/code.
- Zip your assignment folder and attach it as a file. To ensure anonymity:
- DO NOT include your name in any of the files or folders
- DO NOT include the
.gitfolder before zipping, otherwise it will contain your commit history which has your name and email in it - Optionally, you may include your
.devlog.mdfile if you want to share your design diary with your reviewers
- Click the
Save changesbutton at the bottom. - You’ll be able to start assessing your peers the day after the assignment is due.