Environment Setup
🎯 Objectives
- Install the Windows Subsystem for Linux (Windows users only).
- Install Docker.
- Install Visual Studio Code.
If you’re using 🍎 MacOS or a 🐧 Linux distribution, you can skip down to the 🐳 Docker section.
🪟 Windows Users
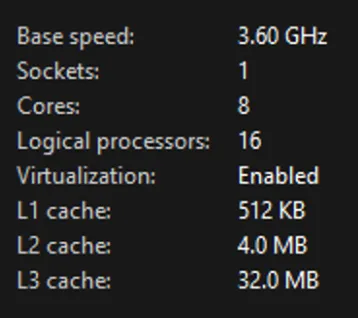
- Make sure virtualization is enabled by going to the Task Manager under the Performance tab:
- If virtualization is disabled, you’ll have to go into your BIOS and enable virtualization. This will look different depending on what kind of motherboard you have, usually Intel or AMD.
- For AMD, enable a feature in the BIOS called SVM.
- For Intel, enable a feature in the BIOS called VT-x.
- If none of these work, you’ll have to look up how to turn on virtualization for your specific model of motherboard.
- Click on the Windows button, type “features”, and select Turn Windows features on or off.
- Enable Virtual Machine Platform.
- Enable Windows Subsystem for Linux.
- Click OK and restart your computer.
- Click on the Windows button, type “Microsoft Store”, and open the Microsoft Store app.
- Search for “WSL” and install Windows Subsystem for Linux.
🐳 Docker
-
The getting started guide on Docker has detailed instructions for setting up Docker on Mac, Linux and Windows.
-
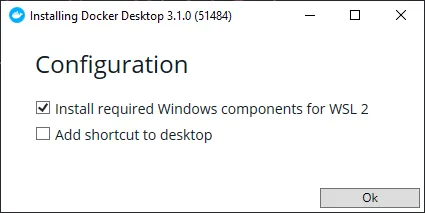
🏠 Windows users: If the installer prompts you, make sure WSL2 option is checked:
👩💻 VS Code
- Download and install the appropriate version of VS Code for your OS.
- When you open VS Code for the first time, it might prompt you to install the
Dev Containerextension. If it does, click install.- If you already had VS Code installed, you’ll have to go to the extensions tab in the left navigation bar (icon of the 4 squares) and search for
Dev Container. Click install.
- If you already had VS Code installed, you’ll have to go to the extensions tab in the left navigation bar (icon of the 4 squares) and search for
Congratulations - you’re now set up to run NodeJS applications! 🥳

Retrieved from Dilbert