4.3 - Sessions
🎯 Objectives
- Explain how server-side sessions maintain user-specific data across requests.
- Implement authentication routes (login, logout) that create, manipulate, and destroy sessions.
- Protect specific routes based on session data.
- Implement a session expiration system to clear session data after a certain amount of time has passed.
🔨 Setup
- Navigate to the template repository for this exercise and follow these directions to fork it.
- Assuming Docker is started, in VS Code, hit
CMD/CTRL + SHIFT + P, search + rundev container: open folder in container, and select the downloaded folder. - In the terminal of VS Code, hit the
+icon to open a new terminal instance. Runlsto make sure you’re in the root directory of the exercise and that you seepackage.json. - Run
npm installto install the dependencies. - Run
npm run serverinside a JavaScript debug terminal to start the server. - Open the website in the browser.
🔍 Context
In the last exercise, we learned about sessions and cookies and how we can use server-side sessions to store data on the server that is associated with a user’s visit to a website. Sessions are typically implemented using cookies, but the session data is stored on the server, not the client’s browser. This makes sessions more secure, as the client only has access to the session ID, not the session data itself.
In this exercise, we will implement a basic session system that allows users to log in and log out of a website. We will use sessions to store information about the user, such as their name, and restrict access to certain parts of the website to only logged-in users.
🚦 Let’s Go
Part 1: 🍪 Basic Sessions
-
Let’s first understand the way sessions are implemented in this exercise.
session.ts interface Session {id: string;data: Record<string, any>;}const sessions: Record<string, Session> = {};const createSession = (): Session => {return {id: Math.floor(Math.random() * 1000),data: {},};};- The
Sessioninterface defines the structure of a session object where we store the session ID and the session data. - The
sessionsobject is a dictionary that stores session objects with their IDs as keys. Recall that a dictionary is a collection of key-value pairs which we implement in TypeScript using the Record type. - The
createSession()function generates a new session object with a random ID and an empty data object.
- The
-
The
getSession()function retrieves the session object associated with the user’s visit to the website. If the user has a session ID cookie, the function retrieves the session object from thesessionsobject using the session ID. If the user does not have a session ID cookie (ex. first visit to the site), the function creates a new session object and sets the session ID cookie to the new session’s ID.session.ts export const getSession = (req: IncomingMessage) => {const sessionId = getCookies(req)["session_id"];let session: Session | undefined;if (sessionId) {session = sessions[sessionId];}else {session = createSession();sessions[session.id] = session;}return session;}; -
Inside the
getHome()controller function, follow the steps outlined in the comment. After you retrieve the session object, you can set a session cookie using theSet-Cookieresponse header we learned how to use in E4.1. -
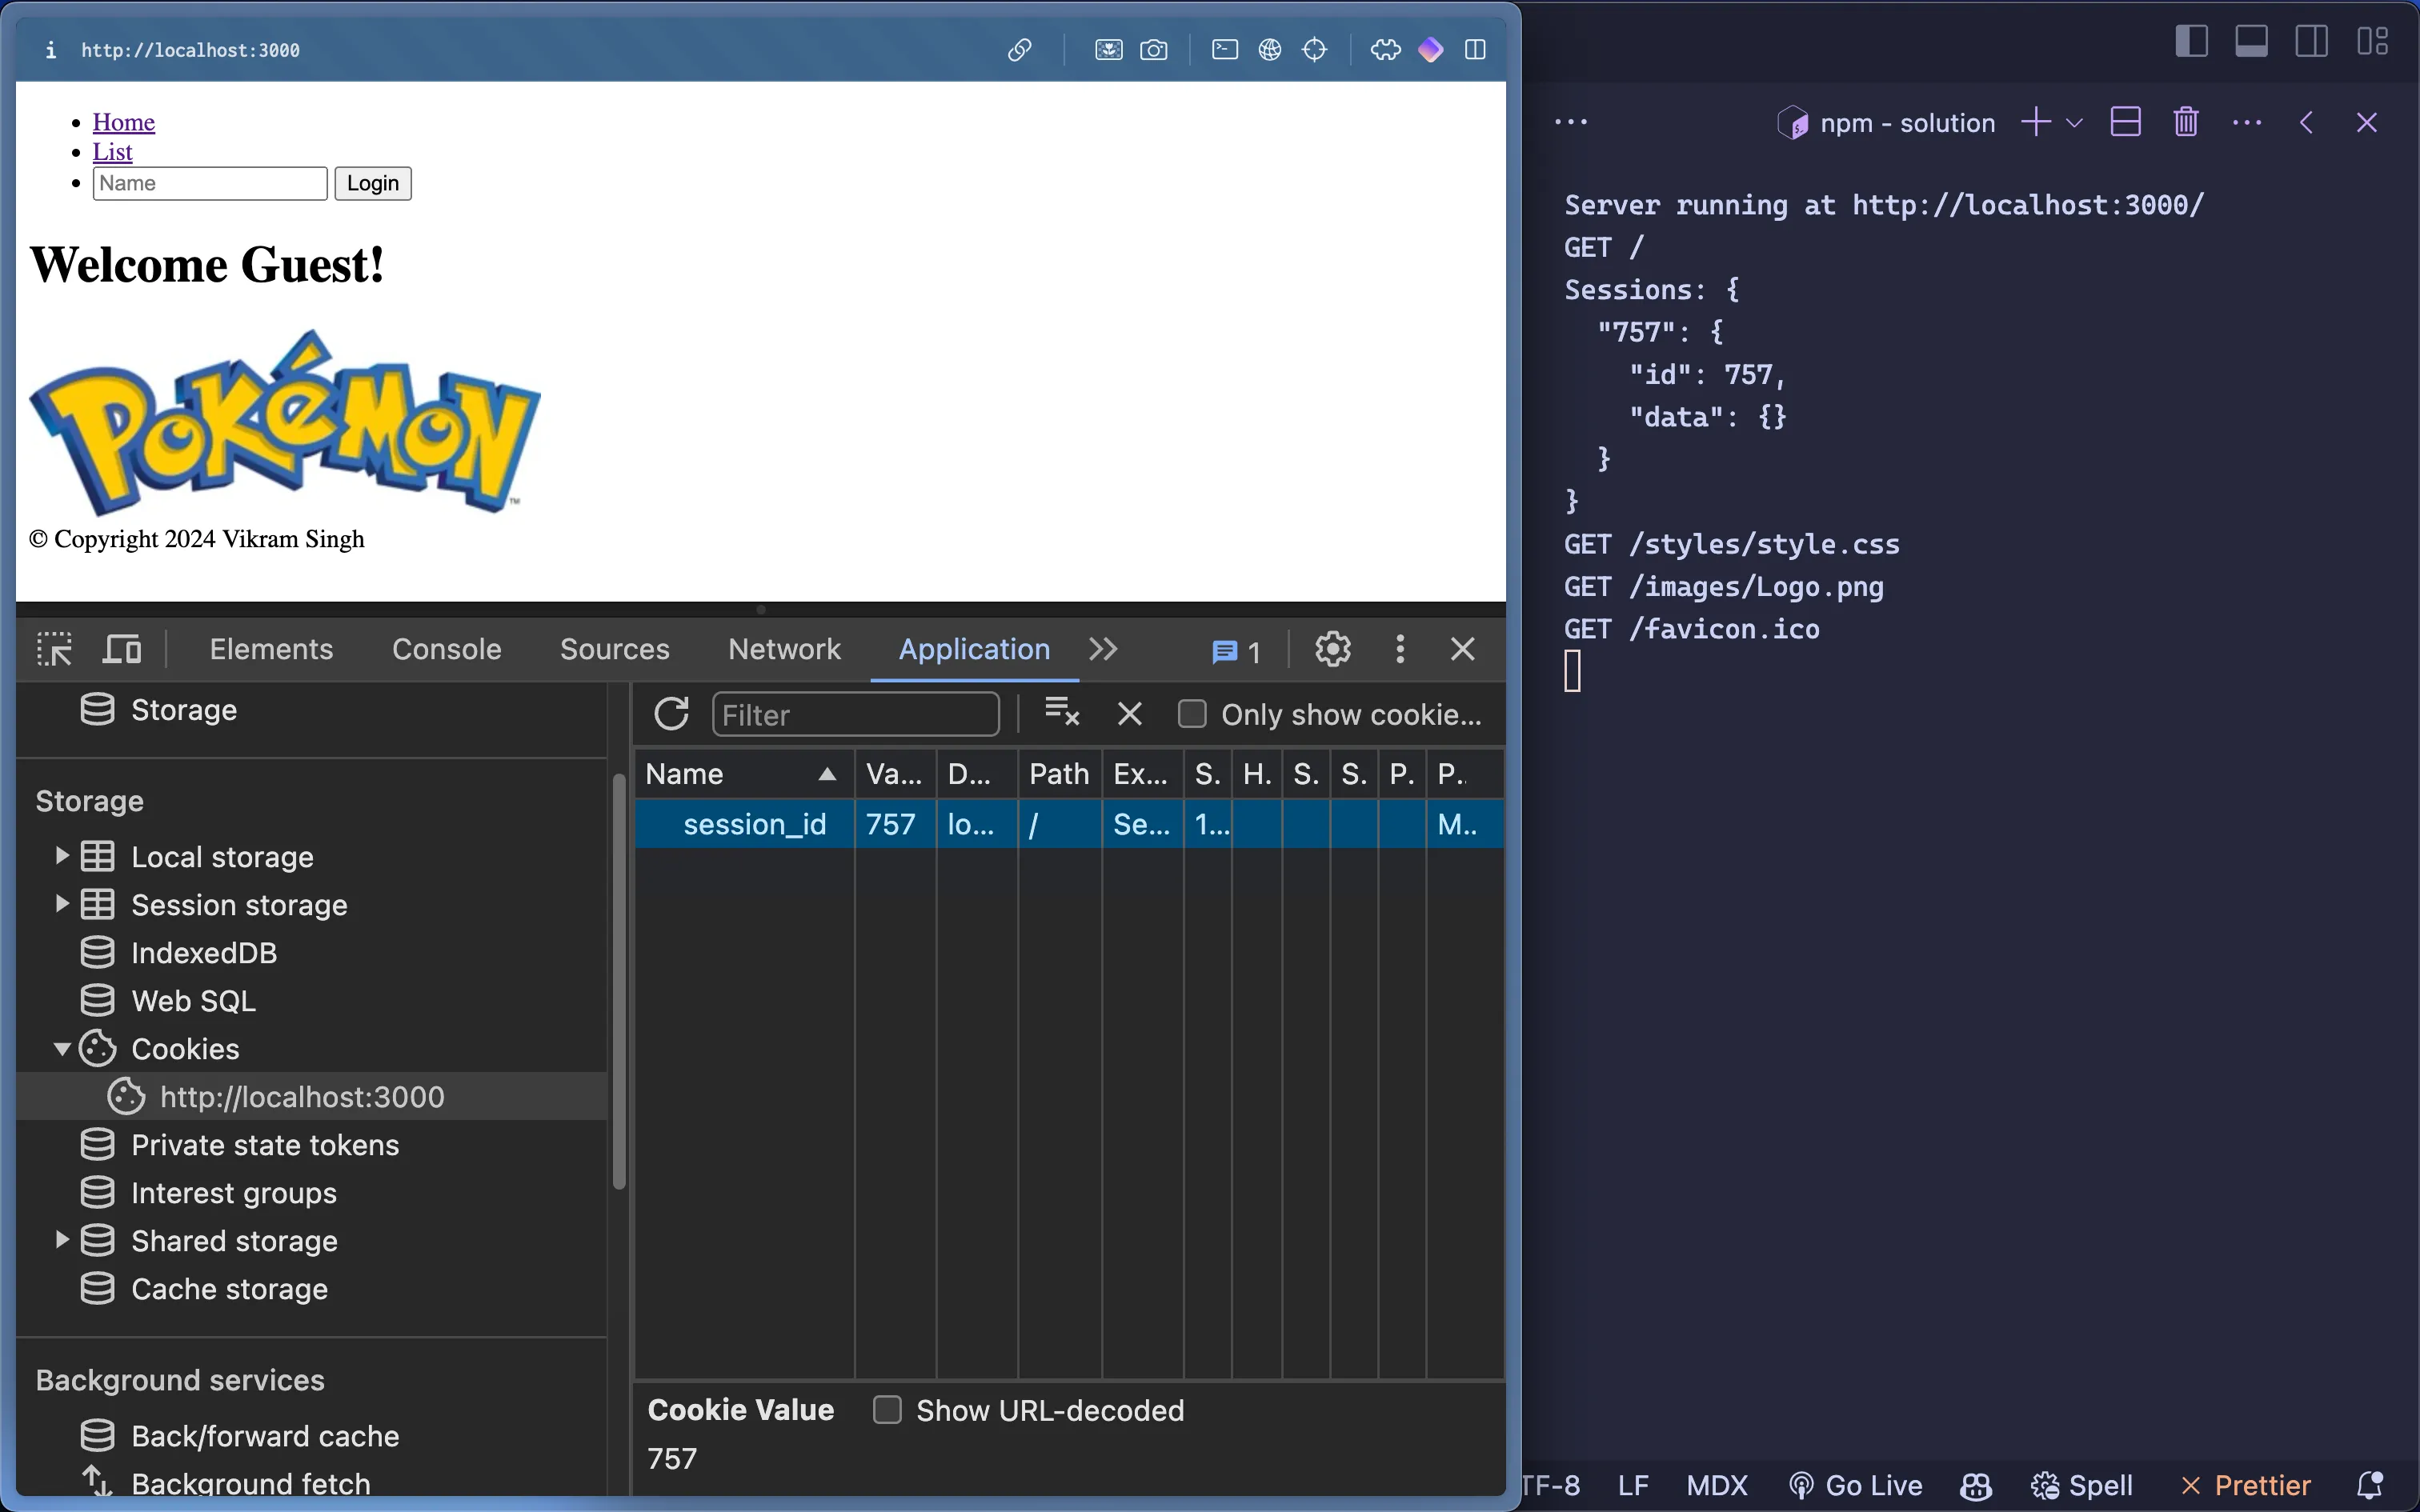
Once that’s done, refresh the page and verify that there is a cookie with the session ID in the browser’s dev tools. Take note of the session ID value.
-
Refresh the page again and verify that the session ID cookie is still present and has the same value. Also verify that the sessions object is being logged to the terminal on each request.
Part 2: 🔓 Logging In
-
Now that we have a working session mechanism in place, let’s implement a login system. Add the following form to the header:
Header.hbs <form action="{{ path 'login' }}" method="POST"><input type="text" name="name" placeholder="Name"><button type="submit">Login</button></form>- The form has a single input field for the user’s name and a submit button. Normally we’d have a password field as well, but for simplicity, we’re only asking for the user’s name.
- The form sends a POST request to the
/loginroute when submitted.
-
Create a new route to handle this request and wire it to the
login()controller function. Then, follow the steps inside thelogin()function to allow the user to log in. -
Modify
getHome()to display a welcome message with the user’s name if they are logged in by using theisLoggedInandnameproperties of the session object, if they exist. -
Next let’s only allow logged-in users to add Pokemon to the database. In the
getAllPokemon()controller function, follow the steps outlined in the comment to only display the form if the user is logged in. This will also require modifying theListView.hbstemplate to only display the form if the user is logged in. -
To test if the login system is working, start with being logged out. Since everytime the server is restarted it clears all session data, you can simply restart the server to log out. Check that you can’t see the form to add Pokemon. Then, log in with a name and check that you can see the form to add Pokemon.
-
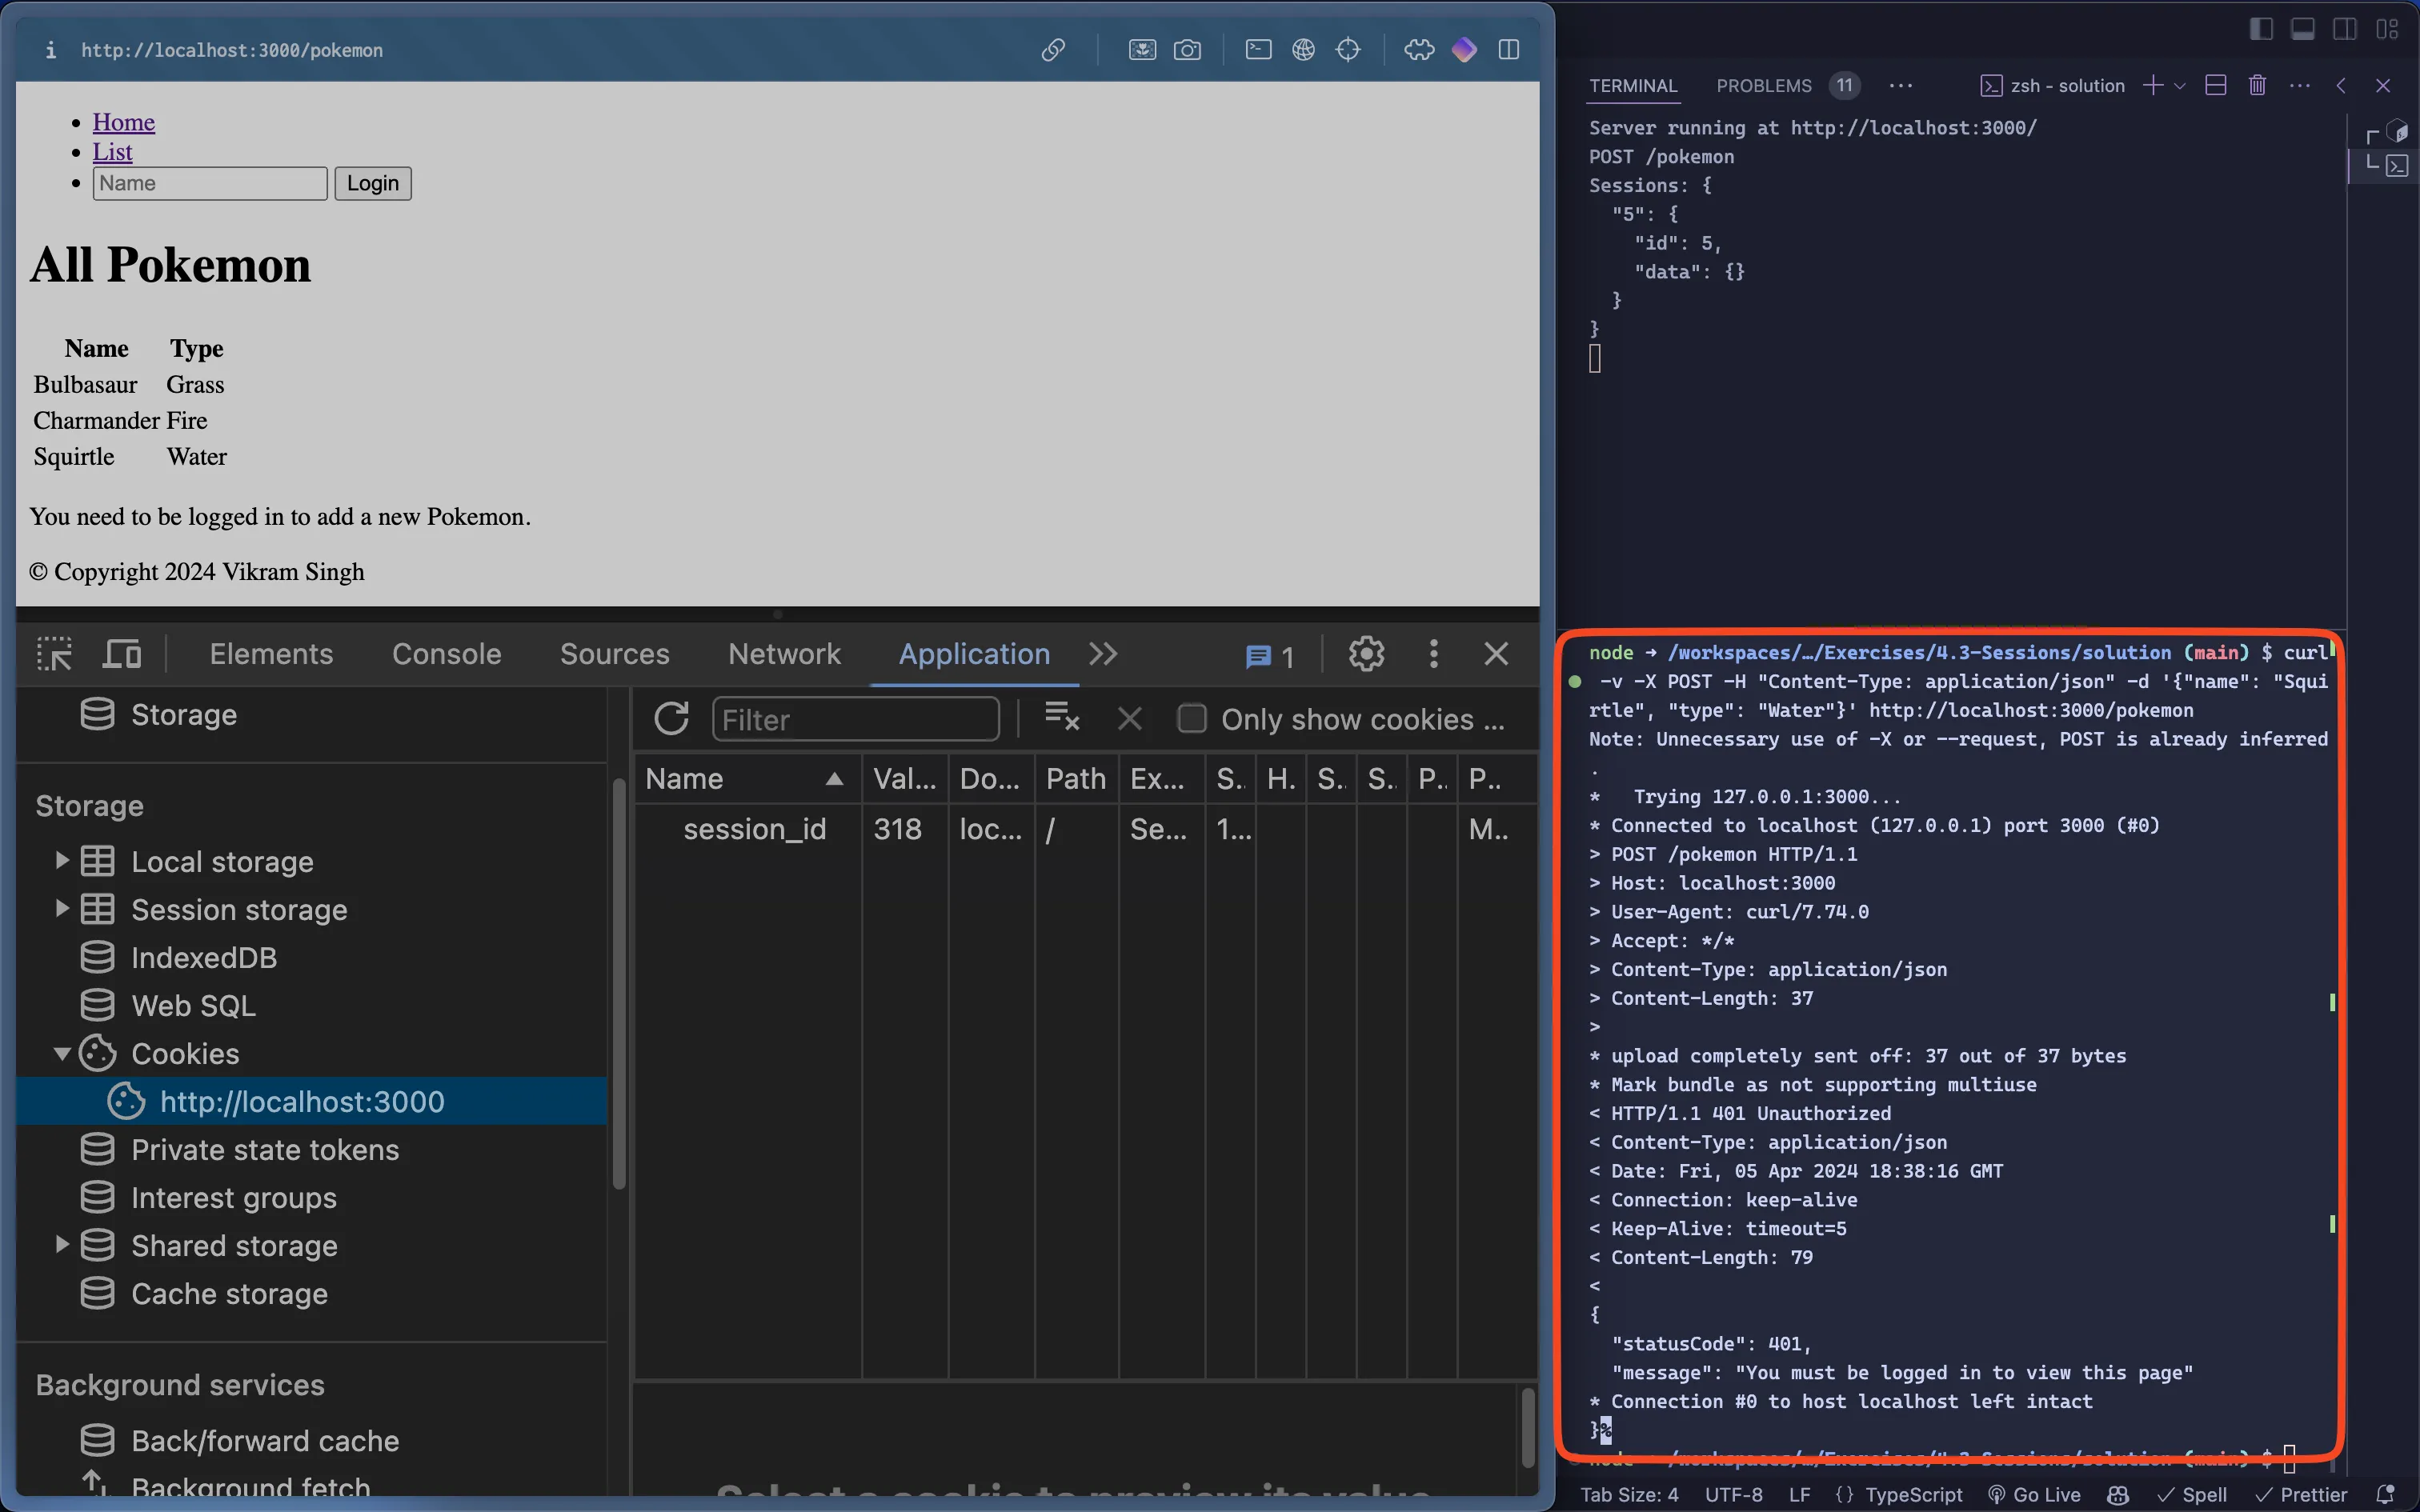
There’s a glaring flaw with our design though! Just because there is no form to add Pokemon, doesn’t mean a user can’t send a POST request to the
/pokemonroute. Try sending a POST request to the/pokemonroute using cURL. You’ll notice that you can still add Pokemon to the database even if you’re not logged in. To fix this, follow the comment in thecreatePokemon()controller function to only allow logged-in users to add Pokemon.
Part 3: 🔒 Logging Out
-
Implement a logout system by adding a logout button to the header. The button should send a GET request to the
/logoutroute.Header.hbs <form action="{{ path 'logout' }}" method="GET"><button type="submit">Logout</button></form> -
Create a new route to handle this request and wire it to the
logout()controller function. Then, follow the steps inside thelogout()function to allow the user to log out.- To make the cookie expire, set the
Expiresattribute of theSet-Cookieheader to a date in the past.
new Date(new Date().getTime() - 5000).toUTCString();For example, this returns a date 5 seconds in the past, and returns a string that can be used as the value of the
Expiresattribute. - To make the cookie expire, set the
-
Verify that the user can be logged out.
- Log in with a name.
- Note the session ID.
- Log out, and check that the session ID is now different.
To really understand how the new session is being set after logging out, let’s walk through the following scenario:
| Request | Client Cookie | Response | Server Cookie | Description |
|---|---|---|---|---|
POST /login | {} | 303 / | {123} | Client logs in, server redirects to the homepage with session cookie 123. |
GET / | {123} | 200 | {123} | Client performs the redirect and sends the cookie with the request. Server responds OK with the cookie back. |
GET /logout | {123} | 303 / | {---} | Client logs out, server redirects with expired cookie, client deletes expired cookie. |
GET / | {} | 200 | {456} | Client performs the redirect with no cookie, server responds OK with new cookie. |
Part 4: 👑 Bonus Challenge
When you logged out, you might have noticed that session data is not being cleared. This is because we are only clearing the session ID cookie, not the session data on the server. This means if someone got a hold of the session ID, they could still access the website as if they were logged in.
This phenomenon is known as session hijacking. To defend against this kind of attack, implement a session expiration system to clear session data after a certain amount of time has passed since the user last visited the website, or once the user logs out.
📥 Submission
Take a screenshot after you log in so that your name is displayed in the welcome message. Make sure to have your browser’s dev tools open to the Application tab showing the session ID cookie, and the server terminal open on the side showing the session data object.
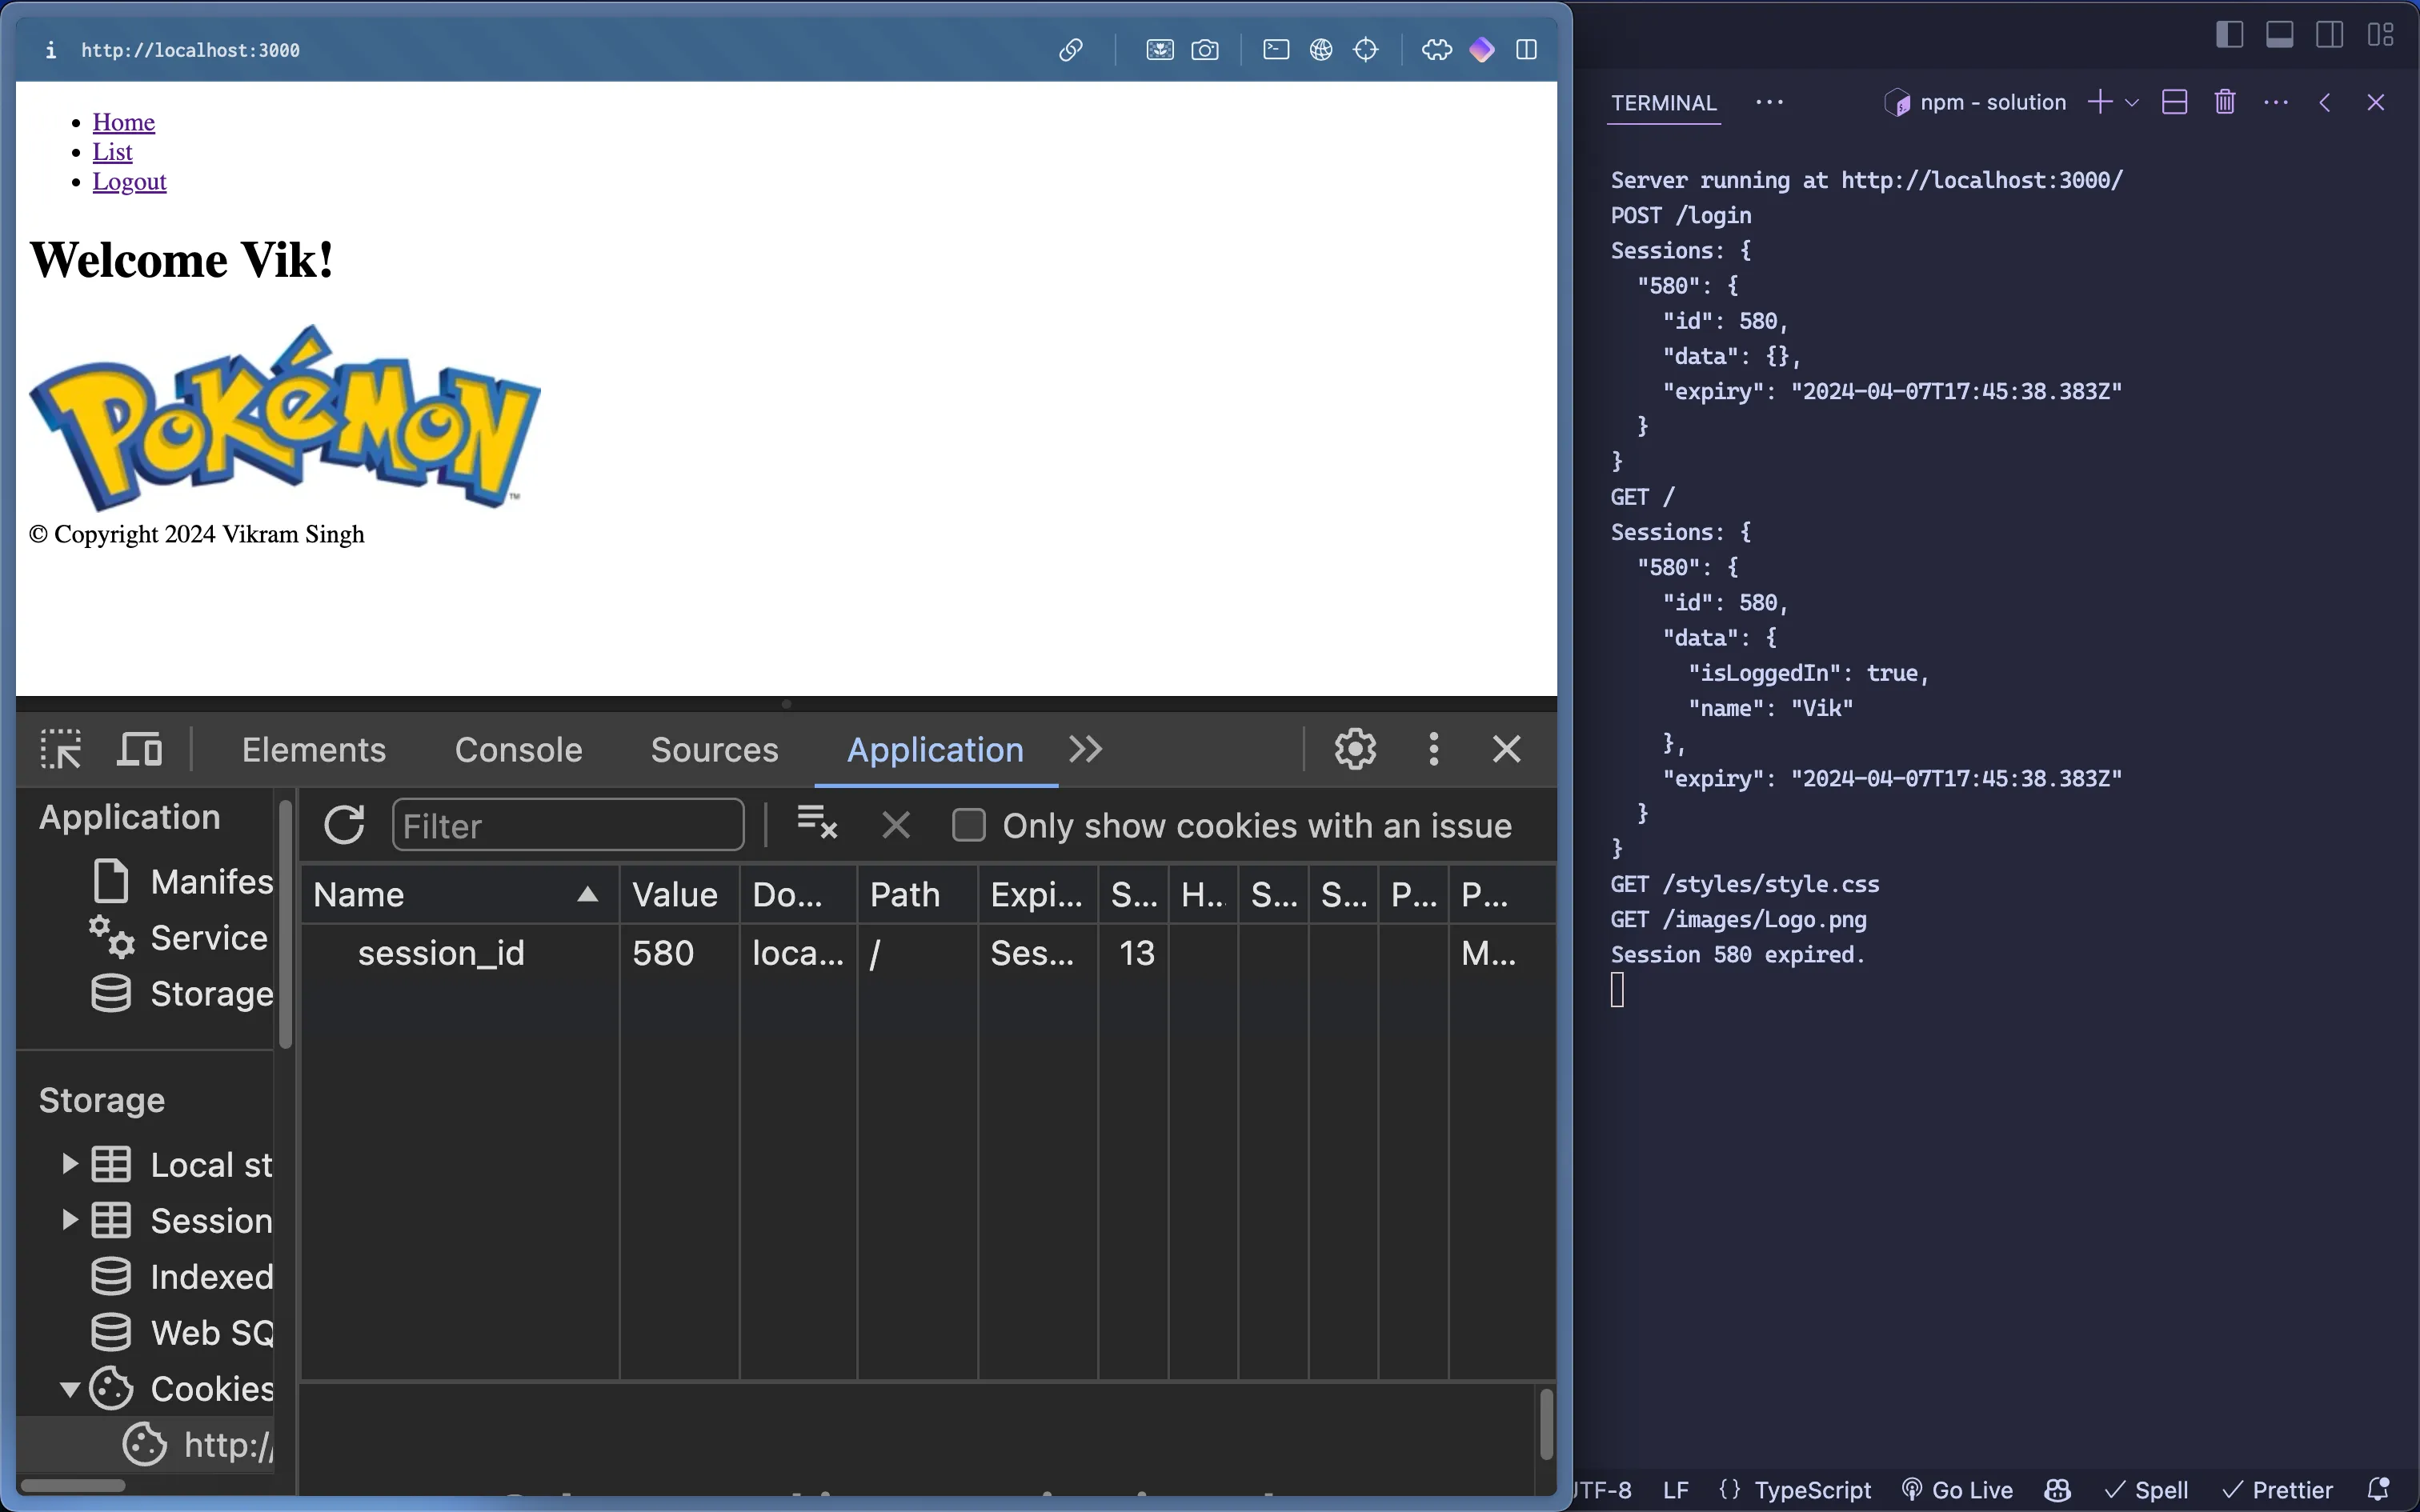
Submit the screenshot on Moodle.