0.2 - Node Modules
🎯 Objectives
- Differentiate between a core, user-defined, and NPM module.
- Use core modules in a Node application.
- Separate out logical pieces of code using user-defined modules.
- Use modules that other developers have written using the Node Package Manager.
🔨 Setup
-
Open Visual Studio Code and open a terminal (
CTRL + `). -
Create a new folder
mkdir ~/web-ii/exercises/0.2-node-modules. -
Navigate inside that folder and create a file with the following name and contents:
pokemon.json [{"name": "Bulbasaur","nickname": "Leafster"},{"name": "Squirtle","nickname": "WaterGuy"},{"name": "Charmander","nickname": "Pyro"}]- Replace the names with your favourite Pokemon if you’d like! 😁
🔍 Context
When writing JavaScript that runs in a Node environment, there are three main places that code can live:
- Core Modules: These are modules that come with Node by default.
- User-Defined Modules: These are modules that we write ourselves.
- NPM Modules: These are modules that other developers have written that we can pull into our own application to avoid “reinventing the wheel”.
🚦 Let’s Go
Before we start working with modules, there’s one thing I’d like to go through first…
Type Checking
JavaScript is a dynamically typed language:
let myNumber = 3;
console.log(myNumber + "5"); // JS will not complain here. It will coerce myNumber to be a string.
// Output: 35
It differs from languages like C# or Java which are statically typed:
int myNumber = 3;
Console.WriteLine(myNumber + '5'); // C# compiler will complain about a type mismatch.
// Output: none
It’s easier to make a mistake while coding when using a dynamically typed language since you don’t have a compiler that will tell you any mistakes you made before you have a working version of your app. We can use features of our editor, Visual Studio Code, to help us while coding JavaScript.
-
Create a file called
type-check.jsinside the exercise directory. -
Write a function called
addthat takes two numbersaandb, and returns the sum ofa + b. -
Declare a variable called
sumand initialize it to the return value of calling theaddfunction. Pass in a string for one of the parameters, and a number for the other. -
Run
node type-check.jsand you should get see the number and the string you passed intoaddconcatenated to each other. -
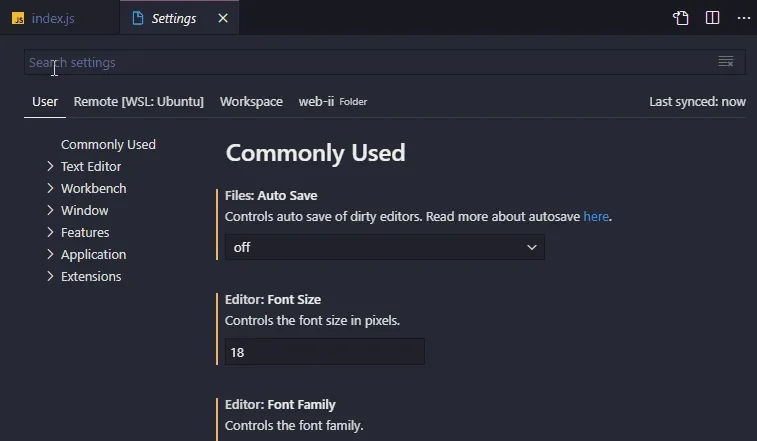
Hit
CTRL + ,(comma) to bring up the settings tab. -
Search for “check js” using the search bar at the top.
-
Go back to
type-check.jsand you’ll notice that… nothing changed! What did that setting do? Basically, now we have the ability to write special comments called JSDoc annotations above our function definitions to describe the different parts of the function. Above the declaration of theaddfunction, write the following:/*** Adds two numbers together.* @param {number} a* @param {number} b* @returns {number} The sum of a and b.*/You should now see a red underline where you called the
sumfunction. If you hover over it, it should say:Argument of type 'string' is not assignable to parameter of type 'number'.Call
addagain on a new line and as soon as you type(to start the invocation, you should see the description of the function: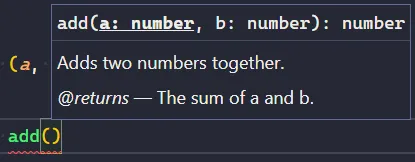
- The types of the input parameters
- The type of the return value
- A description of what the function does
- A description of what the return value represents
Hopefully you can agree that this is a nicer developer experience! The idea of adding static type checking to JS is more prevalent than you might know. Over the years, JS developers eventually got sick of JS not supporting types natively, so they created something called TypeScript which we’re going to start using as of next week.
Alright, now that that’s out of the way, on to modules!
Core Modules
As we saw previously, the Node runtime gives JavaScript access to many objects and functions that JavaScript does not normally have. One example of this is Node giving JS access to the computer’s file system.
-
Head over to the official Node docs, you’ll see a long list of things that we can do with Node. Click on the
File Systemlink, and you will see all of the functions we can use to manipulate the file system. -
Scroll down and find
fs.writeFileSync(...). I want you to become familiar with how to utilize the official documention of a technology instead of going to StackOverflow all the time.- You should see that
fs.writeFileSync(...)can take three parameters. The first two are required, and the third is optional. The way to tell if a parameter is optional is because it will be wrapped in square[]brackets.
- You should see that
-
Create a new file called
app.jsinside the exercise directory. -
Before we can call
fs.writeFileSync(...), we have toimportthefsmodule first. At the top of the file, write:app.js import fs from "fs"; -
Run
npm init -y(we’ll talk about NPM later in this exercise) and it should create apackage.jsonfile. -
Open
package.jsonand add the following property:package.json {"name": "src","version": "1.0.0","type": "module",...}This will allow the
importsyntax from step 4 to work. -
Using the information from the Node docs, see if you can write a string to a file called
core-modules.txtusingfs.writeFileSync(...). It should be a one-liner.- To verify that a file was created properly, you can run
lsin the terminal or refresh the VSC file explorer.
- To verify that a file was created properly, you can run
-
Once you’ve successfully written to a file, try reading the contents of the file using
fs.readFileSync(...)and assign it to a variable. -
Print the contents of the variable to the console. You’ll have to call
.toString()on the variable in order for the string to be properly parsed.
To summarize, core modules are libraries that are available to us by default when using Node.
User-Defined Modules
Right now our app.js is pretty small. Over time, as we add more complexity to our application, the codebase is going to grow pretty large. It’s not good practice to have many different pieces of your application all inside of one file. To split it up, we’re doing to define our own modules.
-
Create a file called
utilities.js. -
At the top of
utilities.js, import thefsmodule as before. -
Declare two functions:
readFromJsonFile(filename)andwriteToJsonFile(filename, data)using the proper JSDoc annotations like we did in the Type Checking section above. What we’re going to do is extend the functionality of thefsfunctions we’ve used so far. -
Inside of
readFromJsonFile:- Declare a variable called
rawTextand initialize it to the return value of callingfs.readFileSync.- The filename that you will pass to
fs.readFileSyncwill be the one that you received from thereadFromJsonFileinput parameter. - Remember to call
.toString()to get the actual text.
- The filename that you will pass to
- Declare another variable called
parsedJsonand initialize it to the return value of callingJSON.parse(rawText).JSON.parse()is a JS function that takes a string containing valid JSON syntax and turns it into an actual JavaScript object.
- Return
parsedJson.
- Declare a variable called
-
Inside of
writeToJsonFile:- Declare a variable called
stringToWriteand initialize it to the return value of callingJSON.stringify(data).JSON.stringify()is a JS function that takes either an array or object and turns it into a string that contains valid JSON syntax.
- Write the contents of
stringToWriteto the filename you received from thewriteToJsonFileinput parameter.
- Declare a variable called
-
Export the two functions:
utilities.js export function readFromJsonFile(filename) {...}export function writeToJsonFile(filename) {...}What’s happening here is we are explicitly making available the two functions we wrote to anyone who imports this file.
-
Erase everything in
app.jsand import our new module at the top of the file:app.js import { readFromJsonFile, writeToJsonFile } from "./utilities.js"; -
Declare a variable called
pokemonand initialize it to the return value of callingreadFromJsonFile('pokemon.json'). -
At this point in the program, we should have successfully read the file and now have an array of objects to work with. Test that everything is working so far by running
console.log(pokemon)and verify that it is indeed an array of 3 objects, each with anameproperty and anicknameproperty. -
Once that is good to go, access the first object of the array and change the
nicknameproperty to a name of your choosing. -
Call
writeToJsonFile('pokemon.json', pokemon). -
Run the program and open
pokemon.json. You should see that the nickname has been changed to the one you specified.
If you’ve gotten this far - awesome! We have now successfully used a core module and have also made our own user-defined module. Great job! 👍
NPM Modules
Even though there are many different core modules at our disposal when using Node, they are quite low level. You may use these low level libraries to build more interesting applications and packages - kind of like how we just did with taking the low level fs module and extending it a little bit to be able to work with JSON data. The truth is, whatever functionality we may want to code ourself, someone else has probably already done it! NPM (Node Package Manager) is a service where developers share useful packages.
-
Head over to the NPM website.
-
Search for json file reader. You should see several libraries people have written that do exactly what we just did in this exercise. Even though there are packages that do exactly what we want, a lot of the time it is better to code things for ourselves so that we can practice and learn how to do things.
-
Now let’s search for faker. You should see a result by the author division-by-zero. If you click on it, you will see that this is a very popular package - 3.7 million downloads every week! What exactly does this package do? Well, a lot of the time when developing applications, we need fake data in order to test if the app is working properly. Instead of writing a package ourself to do this, we can leverage the work of this faker package.
-
How do we use it? Good question! Remember the
package.jsonfile we created before using thenpm initcommand? If we were to submit our application to the NPM website, it would extract all the information from this file in order to populate the package’s webpage. -
Run
npm i @faker-js/faker. After the package finishes installing, you should see a new property inside ofpackage.jsoncalleddependencies. There should be one dependency listed called@faker-js/faker. You should also see a new folder in the exercise directory callednode_modules. This new directory is where the code lives for the@faker-js/fakermodule. -
To use this module in our application, let’s require it at the top of
app.js:app.js import { faker } from "@faker-js/faker"; -
Instead of hardcoding a new nickname for our Pokemon, let’s use faker to generate a random name. How do we know what the correct syntax is, though? If only there was a place where all the information about this package was located… I challenge you to find the right syntax to use faker to generate random names!
-
Set a new randomly-generated nickname for all three pokemon in the array, and run the application a few times. Each time you run it, check
pokemon.jsonto verify that the nicknames are being changed randomly.
📥 Submission
In pokemon.json, change one of the Pokemon names to your name. Run the program a few times and make sure to console.log the value of the pokemon array after the random names have been assigned. Take a screenshot of the output. I should see something like this:

Don’t worry that I have an extra /Development-Environment/ in my path. My file structure is going to be a little different that yours! Yours should be ~/web-ii/Exercises/0.2-Node-Modules. Submit the screenshot in the Moodle drop box called Exercise 0.2 - Node Basics.
Hopefully you found this process fun! It can be very satisfying when you get to use packages that other developers have written. It can definitely save us a lot of time, but it can also cause headaches if there is a bug. Since we’re now working with our code and someone else’s code simultaneously, it can be very time consuming trying to figure out where a particular bug is coming from… But that’s all part of being a developer! 🤓