0.1 - NodeJS Basics
🎯 Objectives
- Explain what NodeJS is and why its useful.
- Compare and contrast client-side JavaScript using a browser versus server-side JavaScript using Node.
- Explain the difference between blocking (synchronous) code and non-blocking (asynchronous) code.
- Write both blocking and non-blocking code.
🔨 Setup
-
Create a new folder somewhere on your computer, I suggest the home
~folder:mkdir ~/web-ii && mkdir ~/web-ii/exercises. -
Open Visual Studio Code, go to
File -> Open Folder, and open~/web-ii/exercises. -
Open a terminal by going to
View -> Terminal(CTRL + `orCMD + `). -
Create a new folder
mkdir ~/web-ii/exercises/0.1-node-basics && cd 0.1-node-basics, and it should appear in the file explorer in VS Code.
🔍 Context
What is NodeJS?
- NodeJS is not a programming language! It’s a runtime environment.
- Before Node, the only place JS could run was in a web browser runtime environment. JS was used only to add interaction to web pages like customizing what happens when a user clicks on a button or dynamically manipulating the DOM.
- With Node, we can create applications that run directly on our machines rather than in a web browser. Node is an alternative runtime that can run JS such that we can do things like access the file system of our computer or talk to databases. This means that we can now use JS to program both the front-end (client) and back-end (server) of our web applications.
Why use NodeJS?
- Node jobs are highly in demand in the web sector. Click here to see for yourself!
- Since Node is just JS at the end of the day, this means that you can use one language for the whole stack (front and back end) which reduces the need to know/maintain multiple languages/technologies.
- It’s trivial to write non-blocking (i.e. asynchronous) code with Node. JS was originally non-blocking when it was written for the browser. If everything in JS was blocking, then when a user clicked a button, for example, they’d have to wait for it to finish before they could continue interacting with the webpage. Non-blocking code enables us to write more performant applications.
🚦 Let’s Go
First we’ll play around with JavaScript in the browser to establish a baseline. This should be very familiar to you already coming from Web Programming I from last semester. After that, we’ll see how JS is different when running it with Node instead of a browser.
Client-Side JavaScript (Browser)
-
Open your web browser of choice. Preferably Chrome or Firefox.
-
Open the developer tools by hitting
CTRL + SHIFT + Iand make sure you’re on the console tab. -
Type a mathematical expression like
1 + 1into the console and hit enter. You should see2as the output. -
Type any string and then
.like you want to call a function. You should see a list appear of all the functions you can call on a string. There are lots!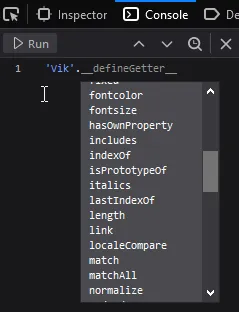
-
Choose the
.toUpperCase()method and execute the statement. You should see the string in all caps as the output. -
Now let’s try something a bit more fun! Go to Google’s homepage, right-click the logo, and click on inspect element. In the DOM that appears in the dev tools, find the
idorclassattribute that the<img>tag is using to display the Google logo. Take note of thatidorclassvalue. -
In another tab, look up any (appropriate) image you think would be funny to display on the Google page and copy the URL to the image. Make sure the URL ends in a valid image file extension like
.jpg,.png, etc. -
Back to the Google tab, in the dev tools console, type:
document.querySelector("#id or .class from step 6").srcset = "";document.querySelector("#id or .class from step 6").src ="http://image.url/from/step/7.png";And you should see your image replace the Google logo!
-
Right-click on the text under the Google search button that says “Google offered in: Français” and note the ID of that element.
-
In the dev tools console, change the text of the element to read
Made by <Your Name>using JavaScript. It will be similar to how you changed the.srcattribute on the<img>element from step 8, but you’ll have to use the.innerHTMLproperty this time to change the text. -
Take a screenshot of the page with your new image and text and save it inside the folder for this exercise. It should resemble something like this:

Now that we’ve seen a little of what we can do with JS in the browser, let’s try it on the server using the NodeJS runtime environment.
Server-Side JavaScript (Node)
-
Switch over to the terminal in your Visual Studio Code window, type
nodeand hit enter.- If you get an error saying “command not found”, then make sure you install the LTS version of Node.js.
-
You should see that your terminal’s prompt has changed to
>. This means that you’re inside of a Node REPL which stands for read evaluate print loop. We can use this REPL environment just like we used the browser dev tools console in the previous section of this exercise. -
As before, type a mathematical expression like
1 + 1into the console and hit enter. You should see2as the output just like when you did this in the browser. -
As before, type any string and then execute the
.toUpperCase()method. You should see the string in all caps as the output.🤔 Hopefully by now you’re thinking, “Well, if everything is the same here (in the terminal) as it is in the browser, then what’s the big deal?“. Great question!
-
The next thing we tried in the browser was accessing the
documentobject. Let’s try doing that now. What happens if you typedocumentinto the REPL Node environment?Terminal window > documentUncaught ReferenceError: document is not defined -
Now type
processinto the REPL and hit enter. What we’re seeing here is several methods and properties that the Node runtime is giving to JS. With thisprocessobject, we can do many things that we could not do in the browser. To prove it, try typingprocessin the browser dev tools console. You’ll see it will come up asundefined. -
One of the methods we can call right now on the
processobject is calledexit(). Do this and you’ll see that we’re now back to the regular bash terminal.
Blocking vs. Non-Blocking Code
Blocking code means that you have to wait for the first operation to finish before the second operation can start. With Node, it is very easy to write code that is non-blocking. This means that you can perform several operations at a time without having to wait for one to finish before executing another.
-
Create two new files called
sync.jsandasync.jsinside of the~/web-ii/exercises/0.1-node-basicsfolder you created in the🔨 Setupsection of this exercise. -
Inside of
sync.jswrite a function calledgetUserSync(id). This function will wait 2 seconds and return an object.- This function will take an integer as input.
- In the body of the function, declare a variable called
timeToStopand set its value toDate.now() + 2000. This value represents a time that is 2 seconds in the future. - Write a
whileloop that hasDate.now() < timeToStopas the condition. Leave the body of the loop empty{}. As you can probably guess, this loop will act as a delay mechanism. - At the end of the function, return an object that has one property. This property should have a name of
userIdand a value ofid.
-
After the
getUserSyncfunction is complete, call it and pass in1as theid. Print the result withconsole.log(). -
Call
getUserSyncagain and pass in2. Print the result. -
Declare a variable called
sumand assign it the expression1 + 1, then printsum. -
Run the program by executing
node sync.jsin the terminal. Make sure you’re in the right directory! What you should see is:- The program waiting 2 seconds then printing
{ userId: 1 } - Waiting another 2 seconds then printing
{ userId: 2 } - Printing
2
- The program waiting 2 seconds then printing
-
Inside of
async.js, write a function calledgetUserAsync(id, callback). This function will asynchronously invoke the callback function we pass into it.- This function will take an integer and a callback function as parameters. If you need a refresher on callback functions, click here.
- In the body of this function, call the
setTimeout()method and pass into it 2 parameters:- A callback function that invokes the callback we originally passed into
getUserAsync(). When invoking the callback, pass in theidas a parameter like this:callback(id); - The integer
2000which represents 2 seconds.
- A callback function that invokes the callback we originally passed into
The purpose of
setTimeoutis to execute code after a specified period of time. What is “special” aboutsetTimeoutis that it is asynchronous. This means that your program will continue to execute whilesetTimeoutwaits for time to pass on its own. -
Call
getUserAsyncand pass in1for the first parameter. The second parameter will be the callback function that we wantgetUserAsyncto invoke. You can either write this callback function externally and pass it in by name:const myCallback = () => {/* Function body goes here. */};getUserAsync(1, myCallback);or you can pass it anonymously in the parameter list:
getUserAsync(1, () => {/* Function body goes here. */});- This callback function should take one parameter:
id. - The body of the callback function should call
console.log, which should print an object. This object should have one property whose key isuserIdand value isid.
- This callback function should take one parameter:
-
Repeat step 8, but pass in
2as the first parameter. -
Declare a variable called
sumand assign it the expression1 + 1, then printsum. -
Run the program by executing
node async.jsin the terminal. Make sure you’re in the right directory! What you should see is:- The program will print
2right away - It will wait 2 seconds and then print
{ userId: 1 }and{ userId: 2 }simultaneously.
- The program will print
-
Take a screenshot of the terminal containing the output from running both scripts.
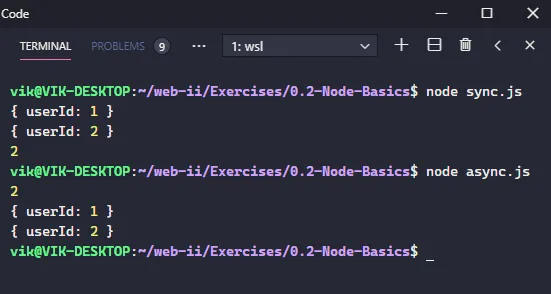
Hopefully you see the difference between blocking/synchronous code and non-blocking/asynchronous code. The blocking example had to wait for each step of the program to finish before executing the next line. The non-blocking example was able to start executing 2 calls of a function while printing the result of 1 + 1 at the same time! Cool 😎
📥 Submission
Submit the two screenshots (or one screenshot if you can manage to stitch them together) you took while doing this exercise in the Moodle drop box called Exercise 0.1 - Node Basics.
Hopefully you now understand the distinction between JS in the browser and JS in Node a little bit better. The core of the JavaScript language stays the same between the two. What changes is the objects that the runtime environment gives to JavaScript to work with.